Concurrent Pipeline with .NET Channels

This post is part of the Fantastic F# Advent Calendar 2021 that has become a Christmas tradition over the years to bring the F# community together in celebration of the holiday season. A special thank you to our organizer, Sergey Tihon (@sergey_tihon) who is keeping this tradition vibrant and magical.

In this post we will leverage the .NET Channels to implement reusable and composable building block functions to define a concurrent workflow. 

In this blogpost example, we are implementing a Pipeline to process a set of images read from the local filesystem. The idea is to create few reusable building blocks that use Channels as an underlying way to implement a high-performant procedures/consumers pattern, and then to use these building blocks to combine the image processing pipeline. In addition, we will apply a “pipeline” higher-order function to these building blocks, which shares the same output type, in order to ease the composition of multiple stages and the option to set a degree of parallelism.

You can download the code here

What are .NET Channels 

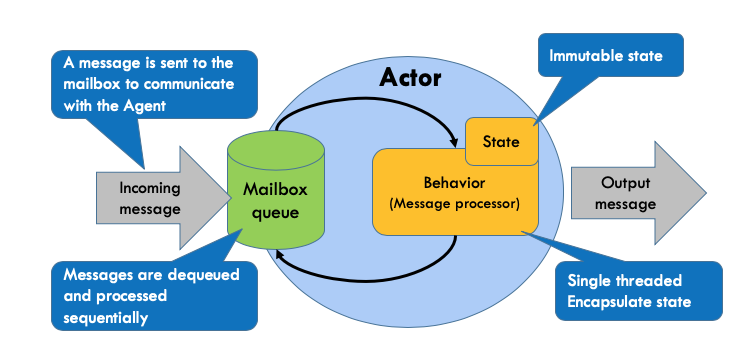
.NET Channels is a static class that aims to provide high performant thread-safe data synchronization in a multithreaded program.

At the core, Channels supports shared data between producers and consumers in a concurrent fashion. Furthermore, Channels supports advanced producer and consumer patterns because one or many producers can write data into the channel, which are then read by one or many consumers. Logically a channel is effectively an efficient, thread-safe queue.

.NET Channels is a static class that exposes factory methods to create two main types of channels (bounded and unbounded). 

(From Microsoft documentation)

CreateBounded<’a> creates a channel with a finite capacity. In this scenario, it’s possible to develop a producer/consumer pattern which accommodates this limit. We can use this type of Channel to store at most a specified number of items. The channel may be used concurrently by any number of reads and writers. Attempts to write to the channel when it contains the maximum allowed number of items results in behavior according to the mode specified when the channel is created, and can include waiting for space to be available, dropping the oldest item, or dropping the newest item. For example, you can have your producer (non-blocking) capacity within the channel before it completes its write operation. This is a form of backpressure; which, can slow your producer down, or even stop it until the consumer has read some items and created capacity.

In F# we can create a Bounded channel with a buffer of the items as follow:


let channel = Channel.CreateBounded<'a>(10)

CreateUnbounded<’a> creates a channel with an unlimited capacity, meaning that Publishers can publish as many times as they want, hoping that the Consumers are able to keep up.  In this scenario, without a capacity limit, the channel will keep accepting new items. When the consumer is not keeping up, the number of queued items will continue to incresase. Each item being held in the channel requires memory which can’t be released until the object has been consumed. Therefore, in this scenario it’s possible to run out of available memory.

In F# we can create an Unbounded channel with unlimited buffer as follow:


let channel = Channel.CreateUnbounded<'a>()

Choosing the right Channel type is extremely important and highly depends on the context. Also, keep in mind that while it’s true that Unbounded Channels are indeed “unbounded”, the memory on the machine normally isn’t.

Channel and back-pressure

The term backpressure is borrowed from fluid dynamics and relates to the software systems dataflow. Backpressure occurs when a computer system can’t process the incoming data fast enough, so it starts to buffer the arriving data until the space to buffer it is reduced to the point of deteriorating the responsiveness of the system or, worse, raising an “Out of Memory” exception.

When creating bounded Channels to prevent backpressure issues, we can provide bounded options in the constractor to apply different strategies such as:


Channel.CreateBounded<T>(new BoundedChannelOptions(capacity)
{
     FullMode = BoundedChannelFullMode.Wait  // Wait - Wait for space to be available in order to complete the operation.    
    BoundedChannelFullMode.DropOldest // Remove and ignore the oldest item in the channel in order to make room
    BoundedChannelFullMode.DropWrite // Drop the item being written.
});

Reader and writer

A Channels I instance exposes two properties:

These properties, as the names suggest, provide a set of methods (everything is done) to either write into the Channels or to read from:

  • TryRead/TryWrite: Attempt to read or write an item synchronously, returning whether the read or write was successful.
  • ReadAsync/WriteAsync: Read or write an item asynchronously. These will complete synchronously if data/space is already available.
  • TryComplete/Completion: Channels may be completed, such that no additional items may be written; such channels will “complete” when marked as completed and all existing data in the channel has been consumed. Channels may also be marked as faulted by passing an optional Exception to Complete; this exception will emerge when awaiting on the Completion Task, as well as when trying to ReadAsync from an empty completed collection.
  • WaitToReadAsync/WaitToWriteAsync: Return a Task<bool> that will complete when reading or writing can be attempted. If the task completes with a true result, at that moment the channel was available for reading or writing, though because these channels may be used concurrently, it’s possible the status changed the moment after the operation completed. If the task completes with a false result, the channel has been completed and will not be able to satisfy a read or write.

Why Channels

.NET Channels offers performance advantages when used to implement a producer consumer pattern when compared to other approaches such as TPL Dataflow and Concurrent Collections. In addition, the Channels asynchronous semantic provides a simple and straightforward way exploit and introduce high performant and thread-safe queue in any modern applications. Channels are a perfect fit when you need to have one or more dedicated threads for handling the queue.

In general, the producer consumer model can help improve the throughput of the application.

Another benefit of using Channels is to decouple producers and consumers, which has the advantage of generating independent producers and consumers from each other, that can be executed in parallel.


Producer/Consumer Pattern

Whenever using programs with any multi-step workflow, consideration must be given to some sort of producer and consumer pattern, which is commonly running serially. In almost every software we write there is a pipeline to achieve, where once a step is completed, then the output is passed to the next step in line, freeing up space for another execution. This pattern is based on the concept that every step in the series must be executed in total isolation, receiving data, processing it, and then pass it over to the next block. Consequently, every block should execute in its own thread, to guarantee the appropriate isolation and encapsulation.  

The producer and consumer patterns can be implemented in different topologies:

  • one Producer and one Consumer
  • one Producer and multiple Consumers
  • multiple Producers and one Consumers
  • multiple Producers and multiple Consumers

Here us a simple implementation of a producer/consumer pattern using channel. From this case we are expanding a more advanced case later in this blog.


let channel = Channel.CreateUnbounded<int>()

let producer () = task {
     for item in [0..100] do
         do! channel.Writer.WriteAsync(item)
     channel.Writer.Complete()
 }

let consumer () = task {
     do!
       channel.Reader.ReadAllAsync()
       |> forEachAsync (fun item -> task {
            printfn $"Received item %d{item}"
       })
}

let runProducerConsumer () =
  let producerTask =  Task.Run(Func<Task>( producer ))
  let consumerTask =  Task.Run(Func<Task>( consumer ))
  Task.WhenAll([producerTask; consumerTask])

In the code, after having initialized a “channel”, the function “producer” that generates the data items sent (or written into) the Channel Writer. Then we notify the channel that the data items generation is completed with the “Writer.Complete()” call. Next, the method “consumer” ingests the data items from the “Channel Reader” to produce a console output. The “Channel Reader” exposes the “ReadAllAsync” method, which allows to read from the channel Asynchronously through the interface “IAsyncEnumerable”. In F#, to support this interface we implement a helper function “forEachAsync”:


let forEachAsync (f: 'a -> Task<unit>) (asyncEn: IAsyncEnumerable<'a>) =
     task {
         let mutable canMoveNext = true
         let enumerator = asyncEn.GetAsyncEnumerator()
         while canMoveNext do
             let! next = enumerator.MoveNextAsync()
             canMoveNext <- next
             if canMoveNext then
                 do! f enumerator.Current } :> Task

In this implementation of the function “forEachAsync”, we assume an ad-hoc case where the output of the AsyncEnumerble stream is either passed into a Channel or produces a side effect that returns “unit”. 

The last method “runProducerConsumer” executes concurrently the previous methods each spawned in a different Task.

.NET Channels helps us deal with these scenarios efficiently by guarantying those producers and consumers, implemented in any shapes, can handle their own tasks without interfering with each other, which is conducive to the concurrent processing of both sides.

Pipelines and Producer/Consumer

In many scenarios, we can create a workflow from the combination of two or more producer/consumer steps, each step performing a different job. This pattern is commonly called pipeline. A pipeline is a concurrency model where a work is performed and moved through several processing stages. Each step performs a part of the complete work, and when it’s completed, the output is passed to the following next stage. In addition, each stage of the pipeline runs in a separate thread, and it does not share any state with the other stages.

Implementing a pipeline using channels

In general, a pipeline begins with a producer method, which starts a process to generate some data that is passed to the first stage of the pipeline, and then the output is moved through the stages. The intermediate stages are executed concurrently. In this case, the Channel operates as a transport mechanism between the stages. The design of a concurrent Pipeline using Channels is composed by stages that take a “Reader Channel” as an input, executes work on each data item asynchronously, and then transfers the result into an “Writer Channel”. 

From the previous producer/consumer implementation using .NET Channels, we can extract a reusable function to behave as base building block to define a workflow. Here is the code implementation:


let pipeline (cTok: CancellationToken) (projection: 'a -> Task<'b>) (reader: ChannelReader<'a>) =
    let pipe = Channel.CreateBounded<'b>(10)
    let writer = pipe.Writer
    let _ = Task.Run(Func<Task>(fun () -> castTask <| task {
            do!
                reader.ReadAllAsync(cTok)
                 |> forEachAsync (fun item -> task {
                      let! outputItem = projection item
                      do! writer.WriteAsync(outputItem)
                    }) cTok
            writer.Complete()
        }
      )
    )
    pipe.Reader

The function “pipeline” takes as input arguments:

  • a cancellation-token, which can be used to stop the pipeline stages
  • a projection function that transforms the data item input read from the ChannelReader<a’>
  • a ChannelReader<a’> to read the data item 

Internally, the “pipeline” function initializes a “bounded” channel (to keep the code simple we set the buffer to 10, but we can expand the function to set this value as needed). This channel is used to write into it asynchronously the output of the projection function. Then, this channel is returned from the function to be passed in other stages of the workflow to share the data for further processing.

The “pipeline” function runs the “consume and produce” logic into a dedicated Task to enable support for concurrency.

The same idea applies to the implementation of an action block, which produces the final side effect of the workflow. 


let pipelineAction (cTok: CancellationToken) (action: 'a -> Task) (reader: ChannelReader<'a>) =
    Task.Run(Func<Task>(fun () -> castTask <| task {
            do!
                reader.ReadAllAsync(cTok)
                 |> forEachAsync (fun item -> task {
                      do! action item
                    }) cTok
        }
      )
    )

TPL Dataflow vs Channels

The System.Threading.Tasks.Channels library provides a set of synchronization data structures for passing data between producers and consumers. Whereas the existing System.Threading.Tasks.Dataflow library is focused on pipelining and connecting together dataflow “blocks” which encapsulate both storage and processing, System.Threading.Tasks.Channelsis focused purely on the storage aspect, with data structures used to provide the hand-offs between participants explicitly coded to use the storage. The library is designed to be used with async/await in C#.
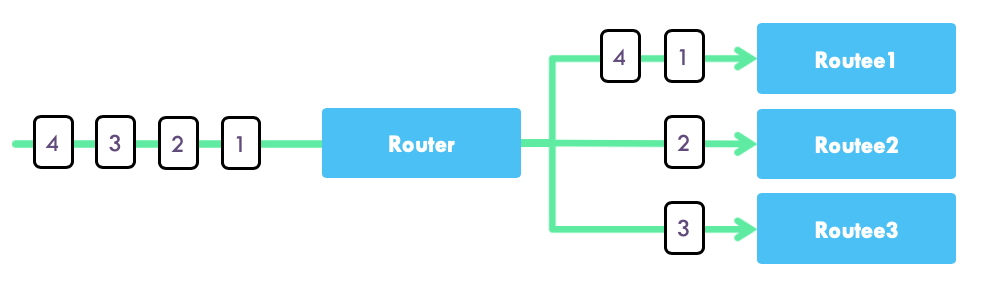
Channel Broadcast

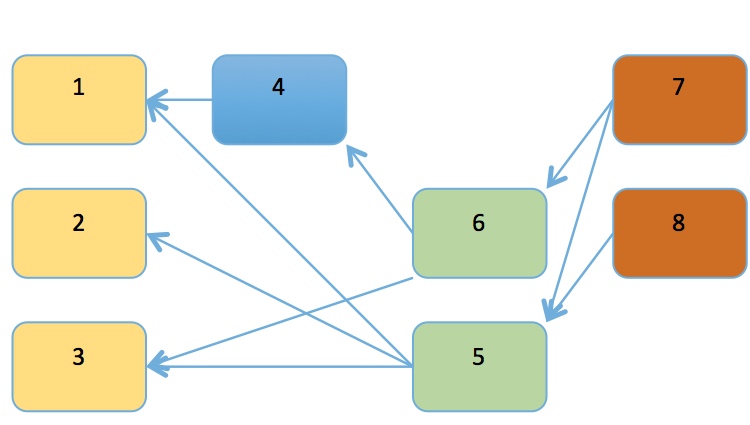
The idea of the Broadcast Channel stage is to provide a reusable function that takes as input a “Channel Reader”, which is used to read data from, and return a set of “Channel Readers” that transport a copy of the same data item. Each of those “Channel Readers” is then connected to a different stage of the pipeline allowing it to process the data concurrently. The Broadcast Channel is useful when dealing with work stages that can originate backpressure because the execution time to consume a data item is slower than the volume of the data items produced by the previous step in the pipeline. Leveraging the Broadcast stage, we can distribute the workload among concurrent stages increasing the capacity of the slow stage to cope with a large volume of data to process. The Broadcast Channel stage takes an input channel and distributes its messages amongst several outputs. The Broadcast stage runs concurrently and in a non-blocking fashion. 

Here the code implementation:


let broadcast (cTok: CancellationToken) n (channel: ChannelReader<'a>) =
    let outputs = Array.init n (fun i -> Channel.CreateUnbounded<'a>())
    let _ = Task.Run(Func<Task>(fun () -> castTask <| task {
        do!
            channel.ReadAllAsync(cTok)
            |> forEachAsync (fun item -> task {
                for output in outputs do
                    do! output.Writer.WriteAsync(item, cTok)
                }) cTok
        for output in outputs do output.Writer.Complete()
    }))
    outputs |> Array.map(fun ch -> ch.Reader)

The “broadcast” function takes as input arguments :

  • a cancellation-token, which can be used to stop the pipeline stages
  • an arbitrary number that defines the count of new channels to initialize for the data sharing
  • a ChannelReader<a’> to read the data item from

When this block runs, a set of “n” new channels is initialized and used to forward the data items read from the channel reader. With this design, each new channel receive a copy of the same data item. Then, the function “broadcast” returns the newly created set of channels to distribute the work among other channels, and possibly to different branches of the workflow. This broadcast” function is useful to increase the degree of parallelism in our pipeline implementation.

Channel Join

The same concept used to implement to Broadcast Channel applies in reverse, where we join a set of “Reader Channels” into a single “Reader Channel” stream. In this way, we can implement a Join stage to read concurrently data items from two or more stages by combining their outputs into a single “Reader Channel”.

Here the code implementation, which is the reverse of the previous “broadcast” function:


let join (cTok: CancellationToken) (inputs: ChannelReader<'a> array) =
    let output = Channel.CreateUnbounded<'a>()
    let writeAsync (input: ChannelReader<'a>) =
        task {
            do!
                input.ReadAllAsync(cTok)
                |> forEachAsync (fun item -> task {
                     do! output.Writer.WriteAsync(item)
                   }) cTok
        } :> Task
    let _ = Task.Run(Func<Task>(fun () -> castTask <| task {
        do!
            inputs
            |> Array.map writeAsync
            |> Task.WhenAll
        output.Writer.Complete()
        }))
    output.Reader

In this implementation, a collection of “Reader Channels” is passed as input into the “join” function, which begins to read data items concurrently and directly passed into a local new single Channel which fuses the outputs from the input channels. The Join stage runs concurrently and in a non-blocking fashion. 

Code implementation details

We have created few reusable building blocks:

  • the “pipeline” block, which helps to create and easily compose the workflow stages 
  • the “broadcast” block, from the TPL Dataflow Broadcast block idea, which enables you to dispatch a copy of the same data item across other stages and/or increase the degree of parallelism of a give stage
  • the “join” block, from the TPL Dataflow Join block idea, which allows you to fuse together into a single channel the output of a set of give channels 

With the help of these building blocks, we can define our workflow for the image processing. For this blogpost, we implement three variants of this pipeline:

  • Sequential Pipeline, which is the simplest implementation of the image processing workflow composing the stages using the “pipeline” function
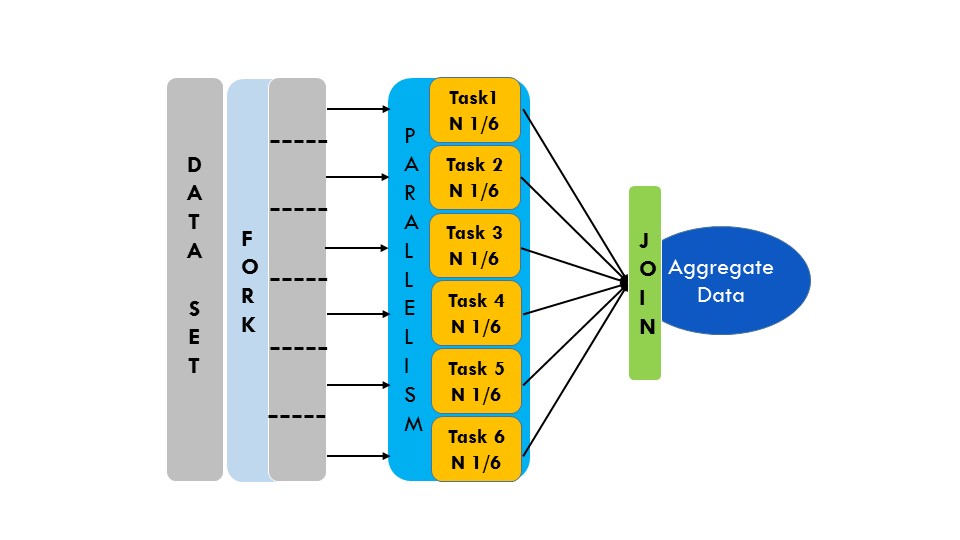
  • ForkJoin Pipeline, which expands the Sequential Pipeline with the exploit of the “Broadcast” and “Join” functions to improve the performance of the pipeline
  • Multi ForkJoin Pipeline, which expands the ForkJoin Pipeline design to support multiple workflow branches

The initial Step. Generate the data

The initial stage of our pipeline generates the data items, which are the begining of the workflow. This stage reads the image files from a give folder, and sends the file read to the next stage of the pipeline functioning as producer.


let dataGenerator sourceImages (cTok: CancellationToken) : ChannelReader<string> =
    let images = Directory.GetFiles(sourceImages, "*.jpg")
    let channel = Channel.CreateBounded<string>(10)
    let rnd = Random()

    let _ = Task.Run(Func<Task>(fun () -> castTask <| task {
        do!
            images
            |> Seq.map (fun image ->
                    task {
                        do! channel.Writer.WriteAsync(image, cTok)
                        do! Task.Delay(TimeSpan.FromSeconds(float(rnd.Next(3))))
                    }
                    :> Task)
            |> Task.WhenAll
        channel.Writer.Complete()
        }), cancellationToken = cTok
    )
    channel.Reader

The next step is loading the images from the filesystem to create a record type ImageInfo, which is used to keep details of the image file, and ultimately it passes the output to a Channel that is returned from this function and ready to be passed to the next stage of the pipeline functioning as producer.

The next steps follow the same pattern, therefore I left out the repetition of the same code details. 

The Sequential Pipeline

Here is the code implementation of the Sequential Pipeline:


let executeSequential (source: string) destination = task {

    if Directory.Exists destination |> not then
        Directory.CreateDirectory destination |> ignore

    let cTok = new CancellationTokenSource()

    let pipelineCtok f = pipeline cTok.Token f

    do!
        dataGenerator source cTok.Token
        |> pipelineCtok (fun path -> task {
            let! image = ImageProcessingHelpers.loadImageAsync path
            let outputItem =
                 {
                     name = Path.GetFileName(path)
                     source = path
                     destination = destination
                     image = image
                 }
            return outputItem
            })
        |> pipelineCtok (fun imageInfo -> ImageProcessingHelpers.scaleImage imageInfo)
        |> pipelineCtok (fun imageInfo -> ImageProcessingHelpers.convertTo3D imageInfo)
        |> pipelineAction cTok.Token (fun imageInfo -> ImageProcessingHelpers.saveImage imageInfo)
}

In the code creating the different steps of the workflow:

  1. loadImageAsync
  2. scaleImage
  3. convertTo3D
  4. saveImage

Then we composed them together using the “pipeline” function. The last step of the pipeline uses “pipelineAction” function to save each the image processed.

The ForkJoin Pipeline

Here the code implementation of the ForkJion Pipeline:


let executeForkJoin (source: string) destination = task {

    if Directory.Exists destination |> not then
        Directory.CreateDirectory destination |> ignore

    let cTok = new CancellationTokenSource()
    let pipelineCtok f = pipeline cTok.Token f

    let broadcast = broadcast cTok.Token 4 (dataGenerator source cTok.Token)

    let pipe reader =
        reader
        |> pipelineCtok (fun path -> task {
            let! image = ImageProcessingHelpers.loadImageAsync path
            let outputItem =
                 {
                     name = Path.GetFileName(path)
                     source = path
                     destination = destination
                     image = image
                 }
            return outputItem
            })
        |> pipelineCtok (fun imageInfo -> ImageProcessingHelpers.scaleImage imageInfo)
        |> pipelineCtok (fun imageInfo -> ImageProcessingHelpers.convertTo3D imageInfo)

    do!
        broadcast
        |> Array.map pipe
        |> join cTok.Token
        |> pipelineAction cTok.Token (fun imageInfo -> ImageProcessingHelpers.saveImage imageInfo)
}

In this code implementation, we are expanding the Sequential Pipeline to run concurrently in four different tasks using the broadcast function, which aims to improve the performance because we can process four images simultaneously. Ultimately, we are combining the Channel outputs into a single stream Channel to save the images as a last single step. 

The Multi ForkJoin Pipeline

Here the code implementation of the MultiForkJion Pipeline:


let executeMultiForkJoin (source: string) destination = task {

    if Directory.Exists destination |> not then
        Directory.CreateDirectory destination |> ignore

    let cTok = new CancellationTokenSource()
    let pipelineCtok f = pipeline cTok.Token f

    let pipe transform reader =
        reader
        |> pipelineCtok (fun path -> task {
            let! image = ImageProcessingHelpers.loadImageAsync path
            let outputItem =
                 {
                     name = Path.GetFileName(path)
                     source = path
                     destination = destination
                     image = image
                 }
            return outputItem
            })
        |> pipelineCtok (fun imageInfo -> ImageProcessingHelpers.scaleImage imageInfo)
        |> pipelineCtok (fun imageInfo -> transform imageInfo)

    let pipe3D = pipe (fun imageInfo -> ImageProcessingHelpers.convertTo3D imageInfo)
    let pipeRedFilter = pipe (fun imageInfo -> ImageProcessingHelpers.setFilter imageInfo ImageFilter.Red)
    let pipeBlueFilter = pipe (fun imageInfo -> ImageProcessingHelpers.setFilter imageInfo ImageFilter.Blue)
    let pipeGreenFilter = pipe (fun imageInfo -> ImageProcessingHelpers.setFilter imageInfo ImageFilter.Green)


    let collapse (source: ChannelReader<'a>) (maps: (ChannelReader<'a> -> ChannelReader<'b>) array) =
        let countBranches = maps |> Array.length
        let sources = broadcast cTok.Token countBranches source // 
        Array.zip sources maps
        |> Array.map (fun (reader, map) -> map reader)
        |> join cTok.Token

    let dataSource = dataGenerator source cTok.Token
    do!
       collapse dataSource [|pipe3D; pipeRedFilter; pipeBlueFilter; pipeGreenFilter|]
       |> pipelineAction cTok.Token (fun imageInfo -> ImageProcessingHelpers.saveImage imageInfo)
}

In this code implementation, we are expanding the ForkJoin Pipeline to run concurrently different branches of the image processing workflow. Each branch applies different image processing concurrently fusing together the different stages using the “collapse” function, which creates a pair between the source of the data items with the different workflow branches.


let collapse (source: ChannelReader<'a>) (maps: (ChannelReader<'a> -> ChannelReader<'b>) array) =
        let countBranches = maps |> Array.length
        let sources = broadcast cTok.Token countBranches source  
        Array.zip sources maps
        |> Array.map (fun (reader, map) -> map reader)
        |> join cTok.Token

In the “collapse” function, the source of the data items is based on the “broadcast” function, which are fused together with the “join” function after their processing. The advantage of this design is that each branch of the workflow runs simultaneously with an independent and dedicated task that handles a copy of the data items produced from the initial stage.

I hope this brings you some merry coding and good cheer!  Happy Holidays to you and your family, looking forward to wonderful new year with the vibrant F# community!  

Build a Recommendation engine with ML.NET and F#

In this blog we are going to build a shopping/product recommendation service using F# and ML.NET in NET Core.

I have watched how Machine Learning (ML) tools and trends have evolved in recent years.  I am impressed by the great implementation work MSFT is doing, especially the tool ML.NET.  This tool aids developers to integrate ML in any application easily without the need of having a PhD in ML.

Machine learning has long been a difficult and foreign topic for developers working in the .NET space. Historically, if you had to build a machine learning model, you needed to use programming languages like Python or R.  Still today they are the most popular tools to create and train your ML models.  Although these are great programming languages, if you wanted to enter the ML area, you might have the double challenge to learn ML concepts and new language tools.  This is the benefit that ML brings, you can adopt a tool that you are already familiar with like .NET and NET Core, skipping the learning curve of Python and R.  ML.NET allows developers to easily integrate ML in their code without leaving the .NET space and using tools that we are familiar with.

What is ML.NET 

It is a cross-platform and open-source framework that aims to bring the capabilities of machine learning to .NET ecosystem to cover and solve a variety of scenarios, such as sentiment analysis, price prediction, recommendation, image classification, and so forth.

ML.NET is much more than just a machine learning library; it is an extensible platform that is able to leverage and integrate other ML infrastructure libraries and runtimes, such as TensorFlow and ONNX in a way that you don’t have to know how to use Tensorflow API.   ML.NET abstracts away from you the implementation details to use these libraries

In addition, there is the .NET part, which means that ML.NET allows you to train, build, and ship custom machine learning models reusing your existing experience and skillsets in .NET, which is great because we don’t have to leave the .NET ecosystem

Building an ML Model involves few steps

This diagram represents the code structure and the process of development in ML.NET

First, we need to detect the problem and isolated a good set of quality data, which has to be cleaned and normalized. Then, we need to load the data, and for this step ML.NET offers different options, such as a Text, a CSV file, from a database, and of course as a stream to reduce memory consumption. 

Following that, you need to Extract the features transforming the input data; this is because Machine learning algorithms understand featurized data (only numbers). 

Next, we have to Train the model, for this step we need to add a learner/trainer specifying what column is the feature and what column is the label (or goal) to predict.

Once the estimator has been defined, we can train the model providing the already loaded training data. This returns a model which you can use for predictions.  Now we can Evaluate the trained model for estimate the accuracy.  If we are happy with the Model, we can consume it to achieve predictions passing some new inputs, otherwise we can re-train it in a way to get better accuracy.

Let’s build a product recommendation

You can follow along the steps, and you can find/download the complete source code here.

The goal of a product recommendation engine is to be able to predict the most popular product combinations given a purchased product. To build this product recommendation engine we are going to use the data-set from Amazon that contains a large number of product purchases based on the “Customers Who Bought This Item Also Bought” feature, which contains over a million of product combinations. 

The file format is a simple TSV (Tab Separated Values) with two columns, one for the product-id purchased and a second one the product-id purchased in combination (bought by customers who also bought the first product).

Here the link of the file SNAP Amazon Co-Purchasing Network. The source code contains this file compressed.

This is how the file data-set looks like:

Let’s start creating a simple Console App, I personally use Rider XXXX as an IDE, you can use your favorite tool, more important, is to import the necessary nuget packages to exploit the ML.NET library. For the recommendation engine we need these packages

  • Microsoft.ML
  • Microsoft.ML.Recommender

I am breaking in 9 steps when implementing a ML.NET project

  1. Define the data-model
  2. Create MLContext
  3. Load the data
  4. Split the Data
  5. Convert the Data /  Create Pipeline
  6. Training the algorithm for the model
  7. Use the test data against the model
  8. Check accuracy and improve (cross-validation)
  9. Use the model

The first step consists in defining the data-model to reflect in code the data we are dealing with. In this case we have a TSV file with the information of the product purchases. We can use two Record-Types to define respectively our features and predicted attribute.  These objects have to be mutable for compatibility reasons, in F# we can achieve this decorating the Record-Types with the CLIMutable attribute.

[<CLIMutable>]
type Product = {
    [<LoadColumn(0)>] ProductID : float32
    [<LoadColumn(1)>] [<ColumnName("Label")>] CombinedProductID : float32
}

[<CLIMutable>]
type ProductPrediction = {
    [<ColumnName("Score")>] Score : float32
}

These Record-Types define how the schema of data will look (column names & column types).

The Product Record-Type represents a distinct product purchase combination. Each field of the Record-Type is decorated with the LoadColumn attribute, which notifies the data loader which column to import data from based on the index.

The second Record-Type ProductPrediction denotes the product combination prediction.  In the second step we need to initialize the MLContext., which is the starting point for all ML.NET operations, and it used for all aspects of creating and consuming a ML model.

At its core, MLContext  exposes a set of catalogues like Data, Model and Transformers that basically give access to the API that let us load data, and transform and prepare the data, apply learning algorithms, and make predictions and so forth.

let context = MLContext(seed = Nullable 1)

Next, in the third step we load the data in memory, generating two sub-sets respectively one for training the model and one to test the model trained.

let data = context.Data.LoadFromTextFile<Product>(dataPath, hasHeader = true, separatorChar = '\t')

// Step 3 - Split the Data
let dataPartitions = context.Data.TrainTestSplit(data, testFraction = 0.2)
let trainSet = dataPartitions.TrainSet
let testSet = dataPartitions.TestSet

In this code, we use the method LoadFromTextFile to load the TSV data into memory.  The attribute LoadColumn instructs the method on how to store the loaded data into the Product Record-Type.

When we load data for training, we get back an object that implements the IDataView interface, which is a tabular representation of the data.  

The IDataView is designed to efficiently handle high-dimensional and large data sets and is the component that holds the data during data transformations and model training.  In addition, it is very efficient for loading data in memory, in fact ML.NET was designed to handle datasets of theoretically infinite size using a forward cursor, almost like the cursor in SQL where you might have a table with millions of records, but you touch only few at a given time using the cursor.  

When loading the data, it is common practice to divide the data for the training and testing. 

To partition the data, we split the data-set into a training and a testing sub-set using the TrainTestSplit method. In this case we use 80% of the data for training and 20% of the data for testing. Successively, there will be multiple iterations, where for each iteration the data is shuffled, so that the Training set of data and the Test set data keep changing.  During each iteration we adjust the model to be more accurate.  The goal of a machine learning model is to accurately make predictions on data it has not seen before. Therefore, making predictions using inputs that are the same as those it was trained on may provide misleading accuracy metrics.

After we have loaded the data is time for building the machine learning model.  In general, the implementation of a recommendation engine that generates predictions is based on the Matrix Factorization algorithm.  In our case, we have “only” two IDs as data fields, we are limited to use the One-Class Matrix Factorization.

Matrix factorization (recommender systems)

The idea behind matrix factorization is to represent users and items in a lower dimensional latent space. Since the initial work by Funk in 2006 a multitude of matrix factorization approaches have been proposed for recommender systems. Some of the most used and simpler ones are listed in the following sections.

Matrix factorization is a class of collaborative filtering algorithms used in recommender systems. Matrix factorization algorithms work by decomposing the user-item interaction matrix into the product of two lower dimensionality rectangular matrices. This family of methods became widely known during the Netflix prize challenge due to its effectiveness as reported by Simon Funk in his 2006 blog post, where he shared his findings with the research community. The prediction results can be improved by assigning different regularization weights to the latent factors based on items’ popularity and users’ activeness.

Thankfully, the MLNET library supports all these algorithms, it just requires a bit of a simple set up.

let options = MatrixFactorizationTrainer.Options(   MatrixColumnIndexColumnName = "ProductIDEncoded",
                                                    MatrixRowIndexColumnName = "CombinedProductIDEncoded",
                                                    LabelColumnName = "Label",
                                                    LossFunction = MatrixFactorizationTrainer.LossFunctionType.SquareLossOneClass,
                                                    Alpha = 0.01,
                                                    Lambda = 0.025 )
let pipeline =
    Common.printCyan "Create pipeline..."
    EstimatorChain()
     // map ProductID and CombinedProductID to keys
     .Append(context.Transforms.Conversion.MapValueToKey(inputColumnName = "ProductID", outputColumnName = "ProductIDEncoded"))
     .Append(context.Transforms.Conversion.MapValueToKey(inputColumnName = "Label", outputColumnName = "CombinedProductIDEncoded"))
     // find recommendations using matrix factorization
     .Append(context.Recommendation().Trainers.MatrixFactorization(options))

ML.NET uses the concepts of pipelines; data pipelines and training pipelines is a concept that ensures we have all the points connected from generating the model to running the prediction. You can think of the ML.NET model pipeline as a chain of estimators.  For example, we can load the data, and then append the “Transform the data” step of the pipeline, and then append the “train step” and so forth, until we can run and evaluate the model.

The connotation of pipeline in ML.NET is basically building or aggregating a list of operations that must be performed in order to apply a machine learning algorithm to a model and to prepare the data to feed into this model before the training is done.

In the previous code, to set up the matrix factorization we are providing the LossFunction, which for this case we use the SquareLossOneClass function because it fits the case of building a recommendation model that only uses two values.

The Label column is our goal, it is what we want to predict, which in this case is mapped to the “CombinedProductID” field annotated with the Label ColumnName Attribute of the Product Record-type. 

In the option setting, the Alpha and Lambda parameters are used speed up the training and boost the accuracy of the factorization algorithm.

Here is a more in-depth look at the ML.NET for the recommendation engine.  It has the following sections:

  • MapValueToKey: this step converts the IDs to numbers that the model can understand. The method MapValueToKey reads the ProductID column and builds a dictionary of unique ID values that is used to generate an output column called ProductIDEncoded containing an encoding for each ID. The same operation happens for the Label column (mapped to the CombinedProductID column)
  • MatrixFactorization is part of the “Trainers” module, and it executes the “Matrix Factorization” on the encoded outputs of the previous step MapValueToKey to compute the predicted product combinations for every product.

With the ML.NET pipeline completely set up, we are finally able to train the model on the training partition calling the Fit method

let model = trainSet |> pipeline.Fit

At this point that we have a trained model, we can use the validation data to predict all product combinations, which it will helps us to compute the accuracy metrics of the model.

let metrics = testSet |> model.Transform |> context.Regression.Evaluate

// show the metrics
Common.printGreen (sprintf "Model metrics:")
Common.printGreen (sprintf "  RMSE:%f" metrics.RootMeanSquaredError)
Common.printGreen (sprintf "  MSE: %f" metrics.MeanSquaredError)

This code runs the Transform method to make predictions for every product combination in the test set. Then, the Evaluate method compares these predictions to the concrete product combinations to calculate the model metrics, such as the RMSE value, which evaluates the model and rate its accuracy. RMSE represents the length of a vector in n-dimensional space, made up of the error in each individual prediction.

The last step, if we are happy with the accuracy of the model achieved, is to use the model to make a prediction.

To initialize a prediction engine we use the CreatePredictionEngine method. The generic type constructors for this object are the input class Product and the output class ProductPrediction that produces the prediction. When the prediction engine is initialized, we can run the Predict method to obtain the prediction.

As a starting test we can run few predictions on a specific product with ID 21 to verify if it’s frequently purchased together with product ID 77.

Here the code to to make the prediction:

let engine : PredictionEngine<Product, ProductPrediction> = context.Model.CreatePredictionEngine model

let runPrediction () =
    let productInfo = {
        ProductID = 21.f
        CombinedProductID = 77.f
    }

    let prediction = productInfo |> engine.Predict

    // show the prediction
    Common.printRed (sprintf "Score for product %f combined with %f is %f" productInfo.ProductID productInfo.CombinedProductID prediction.Score)

which output:

At this point we have our recommendation engine working. 

A useful case is to apply the recommendation engine to find the 3 top products to recommend based on a given purchased product. To achieve the goal, we run the prediction iterating through each unique product to predict how it will fit in combination with the purchased one. Then we sort by the highest prediction score and take the top 3. 

Here the code demonstrates how to obtain the 3 recommended products with highest scores for the purchased product with id 61.  

let runPredictionBestMatches productId topN =
    let bestRecommendedProducts productId topN =
        seq {
            for index = 1 to 262110 do
                let product =  {
                    ProductID = float32 productId
                    CombinedProductID = float32 index
                }
                let prediction = engine.Predict product
                {| Score = prediction.Score; ProductID = index |}
        }
        |> Seq.sortByDescending(fun p -> p.Score)
        |> Seq.take topN

    for (index, product) in bestRecommendedProducts productId topN |> Seq.indexed do
        Common.printRed (sprintf "%d) Best match for product: %d is product: %d\t with score: %f" index productId product.ProductID product.Score)


runPredictionBestMatches 61 3

This output running the previous code 

The best 3 matches by score for product id 63 are 8, 99 and 481 with scores between 0.98 to 0.83, which are pretty good values.

As we “wrap” up this blog, I hope that with this new skill you are able to the most compatible recommendations for gifts to “wrap” and put under your Christmas tree!

Distributed Fractal Image processing with Akka.Net Clustering and Docker

This post is part of the Fantastic F# Advent Calendar 2019 that has become a Christmas tradition over the years to bring the F# community together to celebrate the holiday season. A special thank you goes to the organizer, Sergey Tihon (@sergey_tihon) who is keeping this tradition vibrant and magical.

The goal:  Distribute the work across multiple machines using Akka.net and Docker 

The goal of this project is to demonstrate how to implement a program that parallelizes an algorithm by distributing the work across machines, we will emulate the network distribution using Docker containers. The distribution will be done in a reliable, resilient, and fault tolerant fashion. This kind of design is also called “reactive architecture”, which refers to a system that remains responsive even if the system is under a significantly increased load. 

For the sake of the demonstration, we are implementing a program that aims to process a big set of image blocks (tiles) to compose a large fractal image. The idea is to create a huge number of tiles from an empty larger image, and then transform each tile individually and in parallel. Then, we are positioning the tile back to the original location when its rendering is completed. When all the tiles have been processed and put back together, a large fractal (Mandelbrot) image is formed.

Because of the parallel nature of this program, we will see that the forming of the fractal image happens in pieces that are appearing concurrently, like a solving puzzle.  For example, let’s say that we want to generate a Mandelbrot sized with both the width and height of 4000. When we run the program, a blank square image of this size will be split into small squares for processing.  The 4000 square will split into about 40000 squares with side size of 20, which then are processed individually in parallel.   

In general, to improve the performance of a program that runs in a multicore machine, we take a problem that can be broken in smaller parts that can run independently and in parallel, and then re-join the single results to solve the original larger problem. Algorithms like this can be identified as divide-conquer. 

NOTE: The Divide and Conquer pattern solves a problem by recursively dividing it into subproblems, solving each one independently, and then recombining the sub-solutions into a solution to the original problem.

The first step in designing any parallelized system is decomposition.  Decomposition is nothing more than taking a problem space and breaking it into discrete parts.  When we want to work in parallel, we need to have at least two separate things that we are trying to run.  We do this by taking our problem and decomposing it into parts.

Parallelizing a Divide and Conquer algorithm is interesting; however, we will bring the parallelization to the next level, because we will parallelize the computation distributing the jobs across multiple processes (or machines). Concurrent processing makes the most of the multiple cores and threading capabilities of modern processors, but you are still limited by what you can accomplish on one machine.

How can we distribute the jobs across multiple computers seamlessly? How can we guarantee that we won’t lose any jobs in the case of error or network failure?

The answer: Actor programming model.

Over the past 10 years, I have been implementing and/or architecting applications to improve performance by distributing the work cross-processes and consequentially, across machines. Microsoft has made it easier for developers over the years, to leverage the hardware resources to parallelize a program computation.  For example the TPL (Task Parallel Library), the async-await programming model in C#, the async-workflow in F#, and the TPL Dataflow, all assist developers in these practices. 

Despite the benefits those libraries provide in terms of easy to use concurrent programming models and simple ways to increase the performance of a program, they all focus on local resources, which means that the speed increase is limited to the local computer. In order to further increase the performance using those libraries, you must add more hardware resources. This is also called “scaling up” to increase local resources; for example, existing CPUs available on servers.

NOTEScalability is the measure to which a system can adapt to a change in demand for resources, without negatively impacting performance. Concurrency is a means to achieve scalability: the premise is that, if needed, more CPUs can be added to servers, which the application then automatically starts making use of.

In opposition to “scaling up” there is “scaling out” a system, which refers to dynamically adding more servers to a cluster. This is what we are going to discuss in this blog. We are going to implement an application with the goal to distribute a parallel work across multiple machines. (We will use docker to run multiple images to virtualize the machines locally).

For the parallel distribution of the work, Akka.NET fits quite well. In particular, Akka.NET Clustering.  Indeed, the process of Scaling out a system, perhaps to thousands of machines, is not a trivial development, distributed computing is hard… notoriously hard! 

The good news is that Akka.NET will give you some really nice tools to make your life in distributed computing a little easier. Once again, Akka doesn’t promise a free lunch, but just as actors simplify concurrent programming, you’ll see that they also simplify the move to truly distributed computing.

This is the high-level the design of the solution we are going to implement. Each square represents a different dockerized process.

Before jumping into Akka.NET, we have to introduce the main pillar of its foundation: The Actor Programming model.

Why Actor Programming model?

We can program multithreading in almost all the languages today. The challenge remains how to share the state!  Programming multithreaded applications in a traditional way is very difficult, so, you might start to use lock, mutex, semaphore and so on to protect mutable share of state; but, how can you tell the lock is in the right place?  There is no compiler or debugging tool that can detect a problem with a lock. Furthermore, as the name suggests, locking prevents the program from truly running in parallel. It protects the system from crashing because the state cannot be corrupted. Locking has a cost, there are some performance penalties in calling a “Lock” every time for something that you might need to avoid only once every 10000 times. 

In addition, lock-based programs do not compose. You cannot take two atomic operations and create one more atomic operation out of them.

What is the Actor Programming model?

An Actor is a single-thread unit of computation used to design concurrent applications based on message passing in isolation (share-nothing approach). These actors are lightweight constructs that contain a queue and can receive and process messages. In this case, lightweight means that actors have a small memory footprint as compared to spawning new threads, so you can easily spin up 100,000 actors in a computer without a hitch.

An Actor consists of a mailbox that queues the income messages, a state, and a behavior that runs in a loop, which processes one message at a time. The behavior is the functionality applied to the messages

The actor model is one of the primary architectural constructs that help you design your model based on asynchronous, event-driven, and nonblocking communication. The sender sends messages based on the fire-and-forget style, and the receiver’s mailbox gets them for further processing. The primary takeaway of this model is that you don’t have to handle concurrency within your code.  

You can think of actors like very light programmable message queues on steroids.  Those queues are very light in terms on memory footprint, so that you can easily create thousands, even millions of them with minimum impact to the memory consumption. This is because Actors are reactive, they don’t “do” anything unless they’re sent a message.  Actors can receive messages one at a time and execute some behavior whenever a message is received. Unlike queues, they can also send messages (to other actors).  Messages are simple data structures that can’t be changed after they’ve been created, or in a single word, they’re immutable.

Some actor implementations such as Akka.NET offer features such as fault tolerance, location transparency, and distribution.  In this project, the parallelization of the Fractal algorithm is achieved by distributing the work across machines in the network using Akka.NET actors that form a cluster.

What is Akka.NET 

Akka.NET is a port of the popular Java/Scala framework Akka to .NET platform. It is a toolkit to build concurrent, resilient, distributed and scalable software systems.  Akka aims to simplify the implementation of asynchronous and concurrent tasks based on Actor model, whose goal is to achieve better performance results with a simple programming model. 

Why is Clustering

Murphy’s Law sates, “Anything that can go wrong, will go wrong. ” And computers and distributed systems are definitely included. You will have a fault on your production servers at some point in time, whether that be a software crash, a power cut or a network failure.  It’s important that your system can handle issues without causing any downtime to your customers. You get this reassurance for free with Akka. NET clustering. Clustering offers many benefits build your very own concurrent distributed system, which is fault-tolerant and can easily scale up or down to meet requirements. 

What is Clustering

A cluster is a dynamic group of nodes. On each node is an actor system that listens on the network. Clusters build on top of the networking abstraction provided by Akka.Remote.  Akka Remoting is a communication module for connecting actor systems in a peer-to-peer fashion. An Akka Cluster is incredibly useful for scenarios in which you need high availability guarantees that you can’t achieve by using a single machine to host an actor system.

Here are some examples of high availability scenarios that come up often where using clustering is beneficial:

1. Analytics
2. Marketing Automation
3. Multiplayer Games
4. Devices Tracking / Internet of Things
5. Recommendation Engines
6. And more

Implementation – Project details 

The project is a web base application that uses Web-Sockets to update concurrently as an HTML-Canvas with tiles that have been processed to represent a portion of a large Fractal image.  When all the tiles are re-positioned on the Canvas, the large Fractal image will be fully rendered.

The Web application is an Asp .NET Core with Giraffe.   When we start the Fractal rendering, the Web Server notifies multiple running “Remote Actor Systems”, to start the work. These independent processes work in parallel and cohesively together to achieve the same goal as fast as possible.

The solution is composed in three projects:

  • Akka.Fractal.Remote is a console project that initializes an ActorSystem, which runs  the worker actor “tileRenderActor”. This actor is defined in the project Akka.Fractal.Common, and it is responsible for the image processing of the tiles to compose  the Fractal image. This “tileRenderActor” actor is part of the cluster to process the image in a distributed fashion.  This project is replicated for as many actor-system instances we want to run in different processes, and eventually in different machines across the network.
  • Akka.Fractal.Server is the web-based component, which is responsible to initiate the image processing, and to render concurrently the Fractal image.
  • Akka.Fractal.Common is a shared project that contains utilities such as image processing, common actor messages, logging and more. This project is referenced from both the other projects to access mutual functionality.

The Akka.Fractal.Server project implementation 

Let’s start with the “Startup” section of this project, where the first thing that every Akka application does is create an ActorSystem. We use Dependency Injection (DI) built in Asp.NET Core to create a single instance of the Actor System, which can be accessed later using the IoC container.  Then, we create a single instance of the “fractalActor”, that we use to start a new image processing.

let configureServices (services : IServiceCollection) =
    let sp  = services.BuildServiceProvider()
    let env = sp.GetService<IHostingEnvironment>()
    
    services.Configure<CookiePolicyOptions>(fun (options : CookiePolicyOptions) ->
        options.CheckConsentNeeded <- fun _ -> true
        options.MinimumSameSitePolicy <- SameSiteMode.None
    ) |> ignore
    services.AddMvc().SetCompatibilityVersion(CompatibilityVersion.Version_2_1) |> ignore
    
    services.AddCors() |> ignore
    services.AddGiraffe() |> ignore
    services.AddSingleton<ActorSystem>(fun _ ->
                let config = ConfigurationLoader.load()
                System.create "fractal" config ) |> ignore
    
    services.AddSingleton<Actors.SseTileActorProvider>(fun provider ->
                let actorSystem = provider.GetService<ActorSystem>()
                
                let deploymentOptions =
                    [    SpawnOption.Router(FromConfig.Instance) ]
           
                let tileRenderActor =
                    Akka.Fractal.Common.Actors.tileRenderActor actorSystem "remoteactor" (Some deploymentOptions)
                    
                Actors.SystemActors.TileRender <- tileRenderActor
                                      
                let fractalActor = Actors.fractalActor tileRenderActor actorSystem "fractalActor"
                
                Actors.SseTileActorProvider(fun () -> fractalActor)
                )    |> ignore

When the web-server starts, as part of the startup, we configure the IoC “Service Collection” to define the initialization of the “ActorSystem” as singleton

services.AddSingleton<ActorSystem>(fun _ ->
            let config = ConfigurationLoader.load()
            System.create "fractal" config ) |> ignore

The “ActorSystem” can create so called top-level actors, and it’s a common pattern to create only one top-level actor for all actors in the application.  When we “create” the ActorSystem, a configuration is loaded from the local “akka.conf” file, which contains an HOCON style configuration. This file contains details of how to set and run the cluster, the deployment options for the actors, logging information, and more.

akka {
    log-config-on-start = on
    stdout-loglevel = DEBUG
    loglevel = DEBUG

    actor {
        provider = "Akka.Cluster.ClusterActorRefProvider, Akka.Cluster"
        debug {
            receive = on
            autoreceive = on
            lifecycle = on
            event-stream = on
            unhandled = on
        }
        deployment {
            /remoteactor {
                router = round-robin-pool
                nr-of-instances = 8
                cluster {
                    enabled = on
                    max-nr-of-instances-per-node = 5
                    allow-local-routees = on
                    use-role = fractal
                }
            }
        }
    }
    remote {
        dot-netty.tcp {
            port = 0
            hostname = localhost #"0.0.0.0"
        }
    }
    cluster {
        seed-nodes = ["akka.tcp://fractal@lighthouse:4053"]
        roles = [fractal]
    }
}

HOCON stands for Human-Optimized Config Object Notation, which is a format for human-readable data, and a superset/combination of XML and JSON.  Using this configuration file, we are setting the provider “ClusterActorRefProvider” to enable the Akka Clustering feature. Then, in the “Deployment” section, we configure the cluster/routing settings that will be applied to every actor whose name matches the “remoteactor” (and that loads the configuration from this file). As you can already figure by the name, this configuration is targeting the remote actor that will be deployed from the web project.  Ultimately, the “cluster” section sets the list of seed-nodes, which are used to establish the mesh connections between all the nodes. A seed node is a system with a well-known, persistent address, that all of the systems in your cluster can connect to.  For this reason, we are explicitly setting the address here in the “Cluster” section.


seed-nodes = ["akka.tcp://fractal@lighthouse:4053"]

A seed node can be absolutely any ActorSystem that has clustering enabled. Therefore, seed nodes can be any node in your application, but it is recommended that you have a dedicated seed node with no function other than being a seed node. If a seed node goes down or becomes unreachable, your cluster will continue to operate, but new nodes will not be active until all seed nodes are back up again. 

With that in mind, there’s an open source dedicated seed node project called Lighthouse, which is a simple, but effective dedicated seed node. You can deploy as many as you like alongside your app and have your actor systems point at those. Once it’s there, it will never need to be modified unless you want to reconfigure it or there is a new version that you need. Lighthouse is basically a stub of an Akka.NET ActorSystem with cluster capabilities. Later, when we run the application, we will simply create a Docker image to run the Lighthouse seed node. 

The ”Tile Render Actor”

In the web server “Startup”, when we register the singleton factory for the “fractalActor”, we are first creating an instance of the “tileRenderActor”, which is defined in the “Akka.Fractal.Common” project. This actor is then passed into the “fractalActor” constructor to provide the actor reference where to send the messages for the Fractal image processing.

let deploymentOptions =
    [    SpawnOption.Router(FromConfig.Instance) ]

let tileRenderActor =
    Akka.Fractal.Common.Actors.tileRenderActor actorSystem "remoteactor" (Some deploymentOptions)
    
                      
let fractalActor = Actors.fractalActor tileRenderActor actorSystem "fractalActor"

Actors.SseTileActorProvider(fun () -> fractalActor)

to create an Actor instance we need: the current ActorSystem reference, an arbitrary name of the “Actor” (in this example “remoteactor”), and the deployment options.  As previously mentioned, we are loading the configuration for this actor from the local config file “akka.conf”, where the settings in the “deployment” section matches the name of the Actor.

Next, the “fractalActor” is registered as a singleton instance that we can retrieve by calling the associated delegate “Actors.SseTileActorProvider“

services.AddSingleton<Actors.SseTileActorProvider>(fun provider ->
            let actorSystem = provider.GetService<ActorSystem>()

In this way, we use DI as the “Controller” constructor level to get the reference of this delegate, then we can invoke it on demand to access the instance of the actor “fractalActor”.

let sseTileActor = Actors.fractalActor tileRenderActor actorSystem "fractalActor"

Here the giraffe web-part “startFractal” where we get and invoke the delegate “SeeTileActorProvider”.

let startFractal =
    fun (next : HttpFunc) (ctx : HttpContext) ->
        task {
           
            let actorProvider = ctx.GetService<Actors.SseTileActorProvider>()
            let actor = actorProvider.Invoke()
            
            let command = Akka.Fractal.Common.Messages.FractalSize(4000,4000)
            actor.Tell command
            printfn "Sent Command RenderImage"
             
            return! json "OK" next ctx            
        }

After the reference of the actor “actorFractal” instance is retrieved, the process starts by sending the message of the fractal size. In this case, for simplicity, the value is hard-coded to 4000.

Here we create the “command” message and send it, or Tell, to the “fractalActor”.

let command = Akka.Fractal.Common.Messages.FractalSize(4000,4000)
actor.Tell command

Now the fractal image processing starts. Here below is the full implementation of the “fractalActor”

type SseTileActorProvider = delegate of unit -> IActorRef

let fractalActor (tileRenderActor : IActorRef)
                 (system : ActorSystem) name =
    
    spawn system name (fun (mailbox : Actor<Messages.FractalSize>) ->

        let rec loop () = actor {
            let! request = mailbox.Receive()

            let split = 20
            let ys = request.Height / split
            let xs = request.Width / split
            
            let renderActor =
                if mailbox.Context.Child("renderActor").IsNobody() then
                    Logging.logInfo mailbox "Creating child actor RenderActor" 
                    renderActor request.Width request.Height split mailbox.Context "renderActor"
                else mailbox.Context.Child("renderActor")


            for y = 0 to split - 1 do
                let mutable yy = ys * y
                Logging.logInfof mailbox "Sending message %d - sseTileActor" y
                for x = 0 to split - 1 do
                    let mutable xx = xs * x                        
                    tileRenderActor.Tell(Messages.RenderTile(yy, xx, xs, ys, request.Height, request.Width), renderActor)
            
            return! loop ()
        }
        loop ())

To use Akka.NET in an idiomatic functional and F# way, we are using the Akka.NET FSharp module (nuget package Akka.FSharp) that provides several useful functions, such as the “spawn” function used in the previous code to create an instance of the actor “fractalActor”.  Below is the “spawn” function definition

  • spawn (actorFactory : IActorRefFactory) (name : string) (f : Actor<‘Message> -> Cont<‘Message, ‘Returned>) : IActorRef – spawns an actor using a specified actor computation expression. 

This function takes a lambda with the argument type `Actor<Messages.FractalSize>`, which strongly types the message type that the actor receives. The message type FractalSize is defined in the “Akka.Fractal.Common”. When the message is received, we use the size of the Fractal to generate the set of sub-squares and the correlated messages. These messages “RenderTile” contain the size and coordinate of each tile, the coordinate will be used to reposition the block in the correct place to compose the Fractal image.

Next, we iterate through those messages in a for/loop to send them to the “tileRenderActor” remote actor, which will create the partial representation of the Fractal based on the coordinate of the tile.

When a tile is completed, it is sent back to the web server to update the UI. To simplify the UI rendering, we define a different actor “renderActor”, which has the purpose to convert the messages received into a JSON representation. Then the JSON message is sent to update the Fractal Image using the underlying web socket connection.

let renderActor (width : int) (height : int)
                (split : int) system name =
    spawnOpt system name (fun (inbox : Actor<Messages.RenderedTile>) ->
        let ys = height / split
        let xs = width / split

        let rec loop (image : Image<Rgba32>) totalMessages = actor {
            let! renderedTile = inbox.Receive()
            
            Logging.logInfof inbox "RenderedTile X : %d - Y : %d - Size : %d" renderedTile.X renderedTile.Y (renderedTile.Bytes.Length)
                
            let sseTile = Messages.SseFormatTile(renderedTile.X, renderedTile.Y, Convert.ToBase64String(renderedTile.Bytes))
            let text = JsonConvert.SerializeObject(sseTile)
                            
            Middleware.sendMessageToSockets text

            return! loop image (totalMessages - 1)
        }
        loop (new Image<Rgba32>(width, height)) (ys + xs))
        [ SpawnOption.SupervisorStrategy (Strategy.OneForOne (fun error ->
                match error with
                | _ -> Directive.Resume )) ]

The interesting part of the “fractalActor” actor is where an instance of the “renderActor” actor is either created as a children actor, or if it already exists, the same instance is retrieved. In this way we ensure that we have only one running actor of this type.

let renderActor =
    if mailbox.Context.Child("renderActor").IsNobody() then
        Logging.logInfo mailbox "Creating child actor RenderActor" 
        renderActor request.Width request.Height split mailbox.Context "renderActor"
    else mailbox.Context.Child("renderActor")

Next, we need to notify the remote actor “tileRenderActor” to send back the response to the “renderActor” when a tile image is ready. To achieve this pattern, which creates continuous message passing between actors, we simply add the reference of the of the “renderActor” as part of the payload of the message we are sending.

tileRenderActor.Tell(Completed Messages.Completed.instance, renderActor)

In this way, the receiver actor “tileRenderActor” interprets that the “Sender” actor as the “renderActor”, which is then targeted as the reference of where to send the responses. If we don’t use this override, the “Sender” actor is by default the “fractalActor”. This is a very useful pattern that allows to construct easily sophisticated communication topologies.

NOTE: here more info about the “don’t ask tell pattern”

The Akka.Fractal.Remote project implementation 

The third project, the “Akka.Fractal.Remote”, is the heavy worker of this solution.

This project is a Console that runs an ActorSystem to spawn the actor “tileRenderActor” referenced from the Common project. Even if a “simple” Console project, there are few interesting things happening. 

[<EntryPoint>]
let main argv =
    
    Console.Title <- sprintf "Akka Fractal Remote System - PID %d" (System.Diagnostics.Process.GetCurrentProcess().Id)

    let config = ConfigurationLoader.load().BootstrapFromDocker()
    use system = System.create "fractal" config


    Console.ForegroundColor <- ConsoleColor.Green
    printfn "Remote Worker %s listening..." system.Name
    printfn "Press [ENTER] to exit."
    
    system.WhenTerminated.Wait()
    0

The actor “tileRenderActor” is deployed remotely to this project from the “Akka.Fractal.Server” project. The remote deployment is initiated when we instantiate the “fractalActor”. The deployment uses the configuration from the “akka.conf” file, which sets the actor routing with a “Round-Robin” strategy to balance the work across 8 routees. 

/remoteactor {
  router = round-robin-pool
  nr-of-instances = 8
  cluster {
    enabled = on
    max-nr-of-instances-per-node = 5
    allow-local-routees = off
    use-role = fractal
  }

Each of this routees function as a “copy” of the “tileRenderActor” actor, but this is all transparent from the caller/sender of the message. In fact, we send the messages to this actor like any other actor using the “Tell” command. It is the routing strategy that distributes the work in parallel among the underlying actors (routes). Then the router does the message distribution.

The Round-Robin is a strategy where messages are distributed to each actor in sequence, which is good for even distribution. In Akka.NET, routers are used to spawn multiple instances of one actor so that work can be distributed and load balance between them. This router creates its own actors; you provide a number of instances to the router and it will handle the creation by itself.

In the “Akka.Fractal.Remote” console project, when the ActorSystem is initialized, its configuration is loaded from the local “akka.conf” file in combination with the “BootstrapFromDocker” extension, which will be useful later when running the solution with “Docker-Compose”. In fact, this extension allows you to effortlessly inject some arbitrary environment-variables to the Docker images. The only thing that has to change is how the reference to remote actors is looked up, which can be achieved solely through configuration. The code stays exactly the same, which means that we can transition from scaling up to scaling out without having to change a single line of code. For example, we will use these variables to execute multiple instances of the same docker image with different ports exposed. 

Here is the implementation of the “tileRenderActor” actor:

let tileRenderActor (system : ActorSystem) name (opts : SpawnOption list option) =
    let options = defaultArg opts []
    Spawn.spawnOpt system name (fun (inbox : Actor<Messages.RenderTile>) ->
        let rec loop count = actor {
            let! renderTile = inbox.Receive()
            let sender = inbox.Sender()
            let self = inbox.Self
            
            Logging.logInfof inbox "TileRenderActor %A rendering %d, %d" self.Path renderTile.X renderTile.Y

            let res = mandelbrotSet renderTile.X renderTile.Y renderTile.Width renderTile.Height renderTile.ImageWidth renderTile.ImageHeight 0.5 -2.5 1.5 -1.5
            let bytes = toByteArray res
                            
            let tileImage = Messages.RenderedTile(renderTile.X, renderTile.Y, bytes)
            sender <! tileImage
            
            return! loop (count + 1)//              
        }
        loop 0)
       options 

When the Actor receives a message type “RenderTile”, it processes the image using the function “mandelbrotSet” passing along the size and coordinate of the tile. Then the resulting image is converted into a byte array format, which is sent back to the sender with the tile original coordinates

let tileImage = Messages.RenderedTile(renderTile.X, renderTile.Y, bytes)
inbox.Sender() <! tileImage

As previously mentioned, the sender address reference is sent as part of the received message, which the “fractalActor” is informed to use the “renderActor” instead.

That’s it, when this project starts, there will be eight actors “tileRenderActor” running in parallel to cope the high volume of requests and to process all the messages received by load balancing the work.

What about running copies of same project in different processes (or machines)? 

This is when Akka Cluster comes to play in order to coordinate all the jobs across the running nodes scaling out the work.  We are using Docker to create an image for the “Akka.Fractal.Server”, multiple images of the worker project “Akka.Fractal.Remote”, and a seed node image of the Open-Source project “Lighthouse”.

The purpose of Docker is to provide an isolated environment for the applications running inside the container image. Thus, Docker is a perfect fit for our project. For more info see this link.

To execute all the Docker images, we are using a docker-compose.yml file, which is a YAML file that defines how Docker containers should behave when running. Docker-Compose is a tool for defining and running multi-container Docker applications. With Compose, you use a YAML file to configure your application’s services. Then, with a single command, you create and start all the services from your configuration

Using Compose is basically a three-step process:

  1. Define your app’s environment with a Dockerfile so it can be reproduced anywhere
  2. Define the services that make up your app in docker-compose.yml so they can be run together in an isolated environment
  3. Run docker-compose up and Compose starts and runs your entire app

Both the “Server” and “Remote” projects have a dedicate Dockerfile to define what goes on in the environment inside each container. In general, a Dockerfile sets how the image should access and expose resources. Here more details about Dockerfile.

Here an the Dockerfile for the web-server image.

FROM mcr.microsoft.com/dotnet/core/sdk:2.2 AS build-env
WORKDIR /app

COPY ./Akka.Fractal.Server/Akka.Fractal.Server.fsproj ./Akka.Fractal.Server/Akka.Fractal.Server.fsproj
COPY ./Akka.Fractal.Common/Akka.Fractal.Common.fsproj ./Akka.Fractal.Common/Akka.Fractal.Common.fsproj
COPY ./build.sh  ./build.sh 
COPY ./paket.lock  ./paket.lock
COPY ./paket.dependencies  ./paket.dependencies
RUN ./build.sh 
COPY ./.paket/Paket.Restore.targets  ./.paket/Paket.Restore.targets

RUN dotnet restore ./Akka.Fractal.Common/Akka.Fractal.Common.fsproj 
RUN dotnet restore ./Akka.Fractal.Server/Akka.Fractal.Server.fsproj 

# Copy all source code to image.
COPY ./Akka.Fractal.Server ./Akka.Fractal.Server
COPY ./Akka.Fractal.Common ./Akka.Fractal.Common

WORKDIR ./Akka.Fractal.Server/
RUN dotnet build  Akka.Fractal.Server.fsproj -c Release
RUN dotnet publish Akka.Fractal.Server.fsproj -c Release -o publish

# Build runtime image
FROM mcr.microsoft.com/dotnet/core/aspnet:2.2
WORKDIR /app
COPY --from=build-env /app/Akka.Fractal.Server/publish/ .

EXPOSE 80 
EXPOSE 5000

ENTRYPOINT ["dotnet", "Akka.Fractal.Server.dll"]

Each of those Dockerfiles generate a Docker image with a full deployment of the targeting project, and expose the port to access it.  For example, the “Dockerfile.web”, which targets the “Akka.Fractal.Server” project, exposes port 5000. Consequentially, when running the web server image, we can access the web application locally using the address “localhost:5000” and start the Fractal Image rendering.

The Docker compose ymal file

Here the Docker compose ymal file :

services:
  lighthouse:
    image: petabridge/lighthouse:latest
    hostname: lighthouse
    ports:
      - '4053:4053'
      - '9110:9110'
    environment:
      ACTORSYSTEM: "fractal"
      CLUSTER_IP: "lighthouse"
      CLUSTER_PORT: 4053
      CLUSTER_SEEDS: "akka.tcp://fractal@lighthouse:4053"
  #
  akkafractal.web:
    build:
      context: .
      dockerfile: Dockerfile.web
    ports:
      - '0:80'
      - '5000:5000'
    depends_on:
      - akkafractal-worker-1
     # - akkafractal-worker-2
      - lighthouse
    environment:
      ASPNETCORE_ENVIRONMENT: local
      ASPNETCORE_URLS: http://+:5000
      CLUSTER_IP: "akkafractal.web"
      CLUSTER_PORT: 0

  akkafractal-worker-1:
    build:
      context: .
      dockerfile: Dockerfile.remoting
    ports:
      - "0:9110"
    depends_on:
      - lighthouse
    environment:
      CLUSTER_IP: "akkafractal-worker-1"
      CLUSTER_PORT: 0

The first service “lighthouse” creates and runs the image of the seed node lighthouse exposing the port 4053. This is very important, since the other nodes to become part of the cluster have to send a request to join the cluster to this “well-know” address.

The second service “akkafractal.web” runs the Dockerfile.web to create the image of the “Akka.Fractal.Server” exposing port 5000.

The next services are copies of the same image from the Dockerfile.remoting but with a different port exposed. For this example, we are running two copies of this image, however you can have as many as you like – just remember to use a different name!   The port assignment is done auto-magically for you by the seed node “lighthouse”.  In fact, when these nodes request to join the cluster, the seed node coordinates the port assignment.

Note: The sections “environment”, these are variables that are set independently to the docker images.

That’s it… now you can run “docker-compose up”, navigate to the “localhost:5000” and start the application.

May your Mandelbrot be Merry and bring you cheer this Holiday Season!  

Here the link for the full source code

How to parse a high rate stream of data with low memory allocation

When implementing a program, developers should set performance goals for the design up front. Performance is an aspect of software design that cannot be left for the final code optimization. Performance needs to be incorporated throughout the design, beyond code refactoring. Thus, performance should be included as an explicit goal from the start. It is very complex and highly expensive to redesign an existing application from the ground up, thus time spent on the design is worth the investment.  This tutorial aims to leverage a few new Microsoft libraries to implement highly performant data stream processing.

When writing performance-critical and scalable applications, developers have to keep in mind different aspects of the program, especially when these applications are sensitive to memory consumption. Fortunately, both the .NET Framework and .NET Core provide a set of tools to address these developer scenarios. In particular, Microsoft has introduced the Span<‘a> and Memory<‘a> types into the ecosystem with the release of .NET Core 2.1.  This version provides easy a scalable APIs that don’t allocate buffers and avoid unnecessary data copies. These types aim to reduce, and in many cases completely avoid GC generations, improving the performance (during GC generations all threads are stopped).

With Span, there is no allocation!

Quick tour of the Span<’a>   

Span<‘a> is a simple value type that allows you to work with any arbitrary contiguous block of memory, ensuring type safety with no-copy semantics, which reduces the allocation overhead almost completely.

When is Span<’a> is useful? 

To improve the performance of your program, you should reduce the allocations. Span<‘a> can help with this goal For example, when a .NET string is an immutable type, meaning every type of operation that “changes” the string also creates a new string allocating a new object on the heap. Memory allocations produce memory pressure, that ultimately create GC generations. The less GC generations there are in your application, the better the performance is.

Why is it so important? Let’s take for example the Substring method for the String type.  Anytime you want to substring a string, the .NET creates a new string, the necessary memory is allocated and then each character is copied into it. 

Here is the pseudo code 

let substring (source:string) startIndex length =
    let destinaiton = String(length)  
    Buffer.BlockCopy(source, startIndex, destinaiton, 0, length) 
    destinaiton 

let mySubstring (text : string) = substring text 0 5

This example calls the Substring only once but imagine the performance issues that would be created when parsing a CSV file where it’s called thousands of times.

The remedy is slicing, without managed heap allocations! 

The core function of the Span<’a> is slicing. This function does not copy or allocate any memory, it simply creates a Span with a different pointer and length.

Here is the pseudo code to implement a Substring function with no allocation.

let substring (source:string) startIndex length : ReadOnlySpan =
    source.AsSpan().Slice(startIndex, length)

After the AsSpan extension method, which converts the string into a ReadOnlySpan<char>, you can use the Slice function to point to a reference of a portion of the string without copying it. No allocation!

The .NET GC identifies the Span<’a> type, and has the native support for updating this reference when it’s needed during the Compact phase of garbage collection (when the underlying object like an array is moved, the reference needs to be updated, the offset must remain untouched).

Table comparison running 1000 times Substring using regular String Substring method and Span<char> Splice 

MethodString lengthAverage for
100 runs (ns)
Allocation
Substring10071.1781049 B
Slice1001.2590 B

It is noticeable that the Substring implemented using the Slice of Span<char> method is faster, but more importantly has zero allocation, which means no GC generation.

The Memory<’a> type overcomes the Span<’a>stack-only limitations 

Note that there are some limitations using the Span<’a> type due to the fact that it is a struct (value type).  For example, you cannot place the Span<’a> on the heap, use it inside collections, within an asynchronous operations, store it as a plan field, or even a boxing operation.

The Memory<’a> has overcome these limitations, which can be used with the full power of the .NET.  It can be freely used in generics, stored on the heap and used within asynchronous operations. 

In addition, whenever you need to manipulate or process the underlying buffer referenced by Memory<‘a>, you can access the Span<‘a> property and get efficient indexing capabilities. This makes Memory<‘a> a more general purpose and high-level exchange type than Span<‘a>.

If you are a performance junky like myself, and enjoy squeezing out as much performance as possible from your code, I recommend looking into these newly defined types Span<‘a> and Memory<‘a>. However, in this blog, I decided to cover a different set of tools, which are the driving force for Span: the System.IO.Pipelines

The System.IO.Pipelines is a set of tools that extensively use the Span<’a> (and Memory<’a>) types, and more importantly, abstract away most of the hard work required when building asynchronous and/or parallel processing code.  They are less known than TPL and dataflow but are a force multiplier for your code designs.  

The goal

There are many challenges to address when implementing a reactive and scalableapplication that has to process a high-rate stream of events (data) in near real-time.  A few of these challenges are keeping the memory pressure of the application low, minimizing the GC generations, and taming and controlling back-pressure. In addition, the program becomes more complicated if the stream of events to process requires you to parse the incoming data with a delimiter. This means that we have to process the data for every given delimiter that exists.  

For example, if you want to process a continuous stream of data in chunks, the typical code you would write would look like this: 

let processStream (stream : Stream) (process : byte [] -> unit) = async {
    let bufferSize = 0x100
    let buffer = Array.zeroCreate bufferSize
    let! bytesRead = stream.AsyncRead(buffer, 0, bufferSize)
    // Process a single chunk of data from the buffer
    do process (Array.sub buffer 0 bytesRead)
 } 

The mission of this blog: This code has several problems, the full message (chunk of data) to process might not have been fully received in a single call to AsyncRead.  Additionally, it may be the case where multiple messages come back in a single AsyncRead call and the code cannot read it.

When addressing code that reads from Streams, especially reading streams from the network, the code can’t assume that it will get everything in a single call to AsyncRead. A read operation on a Stream can return nothing (which indicates the end of the data), or it could fill the buffer, or return a single byte despite a bigger buffer. How can we fix this?

The mission of this blog    

For the example of this blog we will look into a video surveillance system, which reads continuously from different streams of data originated from IP-video cameras. The goal is to implement a scalable, low memory and low CPU consumption application, since we deploy and run the system in a mobile device, where low resource utilization is very important in order to preserve the battery life of the device.

Scenario: I recently moved to Charlotte NC, in my back yard I receive a daily visit from a group of deer, so I decide to install a feeder, and of course a couple of cameras to be notified and watch when the deer pay us a visit. Thus, I decided to implement a video surveillance system that I could run from my phone.

Goal: First, in order to implement a single camera video surveillance system, employ a basic implementation.  Then analyze the performance problems to be solved.  Next, design application enhancements using the System.IO.Pipelines .NET library, which is designed specifically for implementing high performance IO operations. Ultimately, the goal is to enable four cameras in a multi camera video surveillance system and analyze/compare the resource consumption. The system implemented in this tutorial allows viewing simultaneously from multiple cameras on an iOS mobile device.  The application should be fully asynchronous to ensure responsiveness to users. 

IP Camera (MJPEG support)

The IP cameras (and servers) can be accessed over an IP network, which allows monitoring not only from the actual location of these cameras, but also allows the viewing from any other IP-enabled point of the world using special video surveillance applications.  The digital output of IP-enabled video cameras/servers allows them to be easily integrated with different type of applications.

How Does It Work?

The camera used in the example is a D-Link DCS 8525LH Network Camera, which supports MJPEG (motion JPEG) streams. The MJPEG is a popular format that allows you to download not just a single JPEG image, but a stream of JPEGs. You can think the MJPEG as a video format where each frame of video is sent as a separate, compressed JPEG image.  For more information, see the MJPEG article on Wikipedia.

First of all, we have to send an asynchronous request to an IP-Camera MJPEG URL, then a multipart response is received back to the caller. The challenging part of the code implementation is parsing the multipart stream into the separate images received.  The viewer has to display those JPEG images as quickly as they are parsed to generate the video.  

First implementation (without IO.Pipelines and Span<‘a>)

The first implementation is based on code that does not use the latest .NET Core feature such as Span<‘a>, Memory<‘a> and Channels. This implementation provides a baseline to compare the performance enhancement gained by the implementation that exploits these types. 

Note: In this example, we focus on the important code without being distracted by the details of the UI implementation. The code example is based on Xamarin.Forms, which uses the Image to display imageson a page. The full source code is downloadable from the GitHub link.

The application has the following steps:

To be able to process and render each frame received separately when reading from a stream of data, we have to confront some common pitfalls. We have to buffer the incoming data until we have found a new frame boundary, and then we have to parse the entire buffer returned.

The following code is the first implementation that demonstrates how you can display MJPEG camera stream.

The application has the following steps:

  • The client application does an HTTP request to a special camera’s URL, like http://192.168.20.49/axis-cgi/mjpg/video.cgi
  • The IP-camera replies to this request with a stream of JPEGs delimited with a special delimiter, which is specified in one of the HTTP headers.
  • It then streams the response data
  • Looks for a JPEG header marker
  • Then reads until it finds the boundary marker
  • Copies the data into a buffer
  • Decodes the buffer 
  • Renders the image 
  • Starts over

To be able to process and render each frame received separately when reading from a stream of data, we have to confront some common pitfalls. We have to buffer the incoming data until we have found a new frame boundary, and then we have to parse the entire buffer returned.

The following code is the first implementation that demonstrates how you can display MJPEG camera stream.

let frameHeader = [| 0xffuy; 0xd8uy |]

let chunk = 1048576 // 1 Mb

let findStreamDelimiter (search:byte []) (buffer:byte []) =
   let rec findHeaderArray (arr:byte []) (index:int) : int =
        if Array.isEmpty arr then -1
        elif arr.Length < (search.Length - 1) then -1
        elif arr.[index] = search.[0] && arr.[1 .. search.Length - 1].SequenceEqual search.[1..] then index
        else findHeaderArray (Array.tail arr) (index + 1)
   findHeaderArray buffer 0

let renderStream (request : HttpWebRequest) (progress : IProgress) = async {
     // on the response we grab and use the Content-Type header 
     // to determine the boundary marker that will be sent between JPEG frames
    use! response = request.AsyncGetResponse()

    // find our magic boundary value
    let frameBoundary = response.Headers.["Content-Type"].Split([| '=' |]).[1]

    let frameBoundaryValid = 
        if frameBoundary.StartsWith("--") then frameBoundary
        else "--" + frameBoundary

    let frameBoundaryBytes = Encoding.UTF8.GetBytes(frameBoundaryValid)        

    let imageBuffer = Array.zeroCreate(chunk)
    use cameraStream = response.GetResponseStream()

    // Streams the response data, looks for a JPEG header marker, 
    // then reads until it finds the frame boundary marker, copies the data into a buffer, 
    // decodes it, passes the result to the IPorgress notification to render the image, then starts over.
    let rec readFrames (readStream : Async) = 
        async { 
            let! buffer = readStream
            // find the JPEG header
            let imageStart = findStreamDelimiter frameHeader buffer
            if imageStart <> -1 then 

                // copy the start of the JPEG image to the imageBuffer
                let size = buffer.Length - imageStart
                Buffer.BlockCopy(buffer,imageStart, imageBuffer, 0, size)

                let rec readFrame (buffer : byte array) accSize = 
                    async { 
                        // find the boundary end
                        let imageEnd = findStreamDelimiter frameBoundaryBytes buffer 
                        if imageEnd <> -1 then 

                            // copy the remainder of the JPEG to the imageBuffer
                            Buffer.BlockCopy(buffer, 0, imageBuffer, accSize, imageEnd)
                            let sizeIncrImageEnd = accSize + imageEnd
                            // create a single JPEG frame
                            let frame = Array.zeroCreate (sizeIncrImageEnd)
                            Buffer.BlockCopy(imageBuffer, 0, frame, 0, sizeIncrImageEnd)

                            // report new frame to render to the UI
                            progress.Report( frame )

                            // copy the leftover data to the start
                            Buffer.BlockCopy(buffer, imageEnd, buffer, 0, buffer.Length - imageEnd)

                            // fill the remainder of the buffer with new data and start over
                            let! tempBuffer = cameraStream.AsyncRead(imageEnd)
                            Buffer.BlockCopy(tempBuffer, 0, buffer, buffer.Length - imageEnd, tempBuffer.Length)
                            return buffer
                        else 
                            // copy all of the data to the imageBuffer
                            Buffer.BlockCopy(buffer, 0, imageBuffer, accSize, buffer.Length)
                            let! data = cameraStream.AsyncRead(chunk)
                            return! readFrame data (accSize + buffer.Length)
                    }
                let! data = cameraStream.AsyncRead(chunk)
                return! readFrames (readFrame data size)
        }
    do! readFrames (cameraStream.AsyncRead(chunk)) 
}


let startCameraStreaming (credential:System.Net.NetworkCredential) (cts:CancellationTokenSource) (cameraUrl:Uri) =
    let request = HttpWebRequest.Create(cameraUrl) :?> HttpWebRequest
    request.Credentials <- credential

// takes the raw byte buffer which contains an undecoded JPEG image, and update the image
let processFrame (image : Image) = 
    { new IProgress with 
        member __.Report( frameBuffer : byte[] ) = 
            image.Source <- ImageSource.FromStream(Func(fun () -> new MemoryStream(frameBuffer) :> Stream))
        }

type CameraStreaming(image : Image, credential:System.Net.NetworkCredential, cameraUrl:Uri) =
 
    let cameraStreaming () = 
        let cts = new CancellationTokenSource()
        let request = HttpWebRequest.Create(cameraUrl) :?> HttpWebRequest
        request.Credentials <- credential
        let processFrameImage = processFrame image
        Async.Start(renderStream request isCameraConnected processFrameImage, cts.Token)
        { new IDisposable with 
            member __.Dispose() = cts.Cancel() }

    member self.Start() = cameraStreaming()  
  1. find the JPEG header
  2. copy the start of the JPEG image to the imageBuffer
  3. find the boundary end (end of the image)
  4. copy the remainder of the JPEG to the imageBuffer
  5. create a single JPEG frame
  6. report new frame to render to the UI
  7. copy the leftover data to the start
  8. fill the remainder of the buffer with new data and start over

there are several parts in this code.

The frameHeader  is a byte array that the MJPEG cameras use to delimit the images. This delimiter acts as buffer boundary. 

The function findStreamDelimiter helps to find the boundaries in the stream, matching the frameHeader value within buffer received to process each image separately.  

The readerStream is the core function, which grabs the camera stream cameraStream from the HTTP response, determines the representation of the image (frame) boundary, and then starts the loop readFrames to read and process the stream of data and render the images as a video.

The initial buffer imageBuffer is set with size of 1 Mb (chunk), which should be enough for the images to buffer.  The code in the body of the recursive function readFrames and the sub-function readFrame have several byte array operations, which in sequence correspond to:

The CameraStreaming type acts as a class that encapsulates the code implementations, and exposes the main method to Start the streaming, which returns a Disposable object to stop the streaming.  The view is updated as a new image and is available using the IProgress pattern.

The IProgress pattern

The asynchronous programming model in the .NET provides the IProgress<’a> pattern that facilitates updates and/or notifications in the background. The pattern is highly productive and solves common developer challenges. The usage is simple, on the client/consuming side of your code, on the UI thread, you have to define an event handler that will be called when IProgress<’a>.Report is invoked. The code below shows how this pattern is utilized in the context of an F# Object Expression.

// takes the raw byte buffer which contains an undecoded JPEG image to update the image
let processFrame (image : Image) = 
    { new IProgress with 
        member __.Report( frameBuffer : byte[] ) = 
            image.Source <- ImageSource.FromStream(Func(fun () -> new MemoryStream(frameBuffer)))
        } 

The Progress<’a> catches the current SynchronisationContext when it is instantiated then, whenever the method Report is called, the captured context is used for the updates. This pattern avoids cross thread issues with updating the UI.

First code implementation thoughts 

This code works, but there are few problems.  First of all, it might work in local testing but it’s possible that the image buffer is bigger than 1 Mb.  For this reason, we have to resize the input buffer until we have found the next header delimiter, which results in more buffer copies.  In addition, the code keeps allocating buffers on the heap as bigger images are processed, which uses more memory as the logic doesn’t shrink the buffer after the images are processed.  One possible improvement could be introducing an ArrayPool<byte> to avoid repeated buffer allocations. This would also introduce more code complexity. 

Running the application

The code below runs and renders a single camera stream using the first implementation.

open Xamarin.Forms
open Xamarin.Forms.Xaml

type MainPage() =
    inherit ContentPage()

    let camersUrl = "http://192.168.20.48/axis-cgi/mjpg/video.cgi"

    let _ = base.LoadFromXaml(typeof)
    let cameraSource = new Image ( Aspect = Aspect.AspectFit )

    let credentials = new NetworkCredential("admin", "myPa55w0rd");
    let camera = CameraStreaming(image, credentials, url)

    let mainStack = base.Content :?> StackLayout
    mainStack.Padding <- new Thickness (0, 10, 0, 0)
    mainStack.VerticalOptions <- LayoutOptions.StartAndExpand
    mainStack.HorizontalOptions <- LayoutOptions.CenterAndExpand
    mainStack.Children.Add(camera.Image)
    do camera.Start() 

The code creates an instance of the CameraStreaming, add an Image control into a StackLayout of the main page, then start the video streaming.

The instance on the Image sets the property Aspect, which sizes the image within the bounds of the display. 

Here below is the output: 

In terms of performance, the application runs with an average consumption of 15% CPU, and about 120Mb of memory pressure. What could happen to the total resource consumption if there were more streaming cameras running?  These values could be acceptable in a Desktop or Server application, but for a mobile device we should reduce these values being careful not to jeopardize the quality of the video streaming.

NOTE: for simplicity, the code in the blog does not have error handling support, which is important when working with network connections. The code downloadable implements safeguard error handling.  

A performant implementation - System.IO.Pipelines in action

In this second implementation of the Video surveillance application, we will look into and exploit the recently added library System.IO.Pipelines to the .NET Core 2.1. This library is used to optimize the resource consumption and maximize the performance of the streaming application.

What is IO.Pipelines ?

IO.Pipelines were introduced with the .NET Core 2.1, and although they haven’t garnered wide popularity among developers, they are extensively used internally by Microsoft to implement performance critical applications.  In fact, this technology is designed to make it easier to do high performance IO operations, and was used to make Kestrel one of the fastest web servers in the industry. 

IO.Pipelines aim to achieve high performance code removing the complexity that in many cases is required to write such high performance application. IO.Pipelines expose a reader/writer access semantic to a binary stream, including thread safety, buffer management and safeguard via back-pressure.

Below is the second implementation of the Video Surveillance application.  Code unchanged in the previous implementation is not shown. 

let frameHeader = [| 0xffuy; 0xd8uy |].AsSpan()

let findStreamDelimiter (search:Span) (buffer:Span) : Nullable =
   let rec findHeaderArray (buffer:Span) (index:int) : int =
        if buffer.Length = 0 || buffer.Length < (search.Length - 1) then Nullable()
        elif buffer.[index] = search.[0] && buffer.Slice(1).SequenceEqual(search.Slice(1)) then
            Nullable (SequencePosition(buffer.GetPosition(index)))
        else findHeaderArray (buffer.Slice(1)) (index + 1)
   findHeaderArray buffer 0

let writePipe (stream : Stream) (writer : PipeWriter) =
    let rec writeLoop () = task {            
        // Allocate at least 1024 bytes from the PipeWriter
        let memory : Memory = writer.GetMemory(minimumBufferSize)
        try
            let! bytesRead = stream.ReadAsync(memory) 
            if bytesRead = 0 then writer.Complete()
            else
                // Tell the PipeWriter how much was read from the Socket
                writer.Advance(bytesRead)
        with
        | _ -> writer.Complete()
        // Make the data available to the PipeReader
        let! result = writer.FlushAsync()
        if result.IsCompleted then  writer.Complete()
        else return! writeLoop()
    }
    writeLoop ()     

let readPipe (reader : PipeReader) (progress : IProgress)=
  let rec readLoop (reader : PipeReader) = task {
      let! result = reader.ReadAsync()
      let buffer : ReadOnlySequence = result.Buffer
      let! (bufferAdvanced:ReadOnlySequence) = findStreamDelimiter reader buffer
      do reader.AdvanceTo(bufferAdvanced.Start, bufferAdvanced.End)
      if result.IsCompleted then reader.Complete()
      else return! readLoop reader
    }
  and findHeaderMarker (reader : PipeReader) (buffer : ReadOnlySequence) = task {
      let position = findStreamDelimiter buffer frameHeader
      if position.HasValue then 
             progress.Report(buffer.Slice(0, position.Value))
             return! findHeaderMarker reader (buffer.Slice(buffer.GetPosition(1L, position.Value)))
      else return buffer }    
  readLoop reader               

let processFrame (request : HttpWebRequest) (progress : IProgress) = task {
    use! response = request.AsyncGetResponse()

    let frameBoundary =
        let contentType = response.Headers.["Content-Type"]
        let frameBoundary = contentType.AsSpan().Slice(contentType.IndexOf('=') + 1)

        if frameBoundary.StartsWith(boundyFrameDelimiter) then
            Encoding.UTF8.GetBytes(frameBoundary)
        else
            let frameBoundary = appendSpans boundyFrameDelimiter frameBoundary
            Encoding.UTF8.GetBytes(frameBoundary)

    use cameraStream = response.GetResponseStream()
        

    let pipe = new Pipe()

    let writing = writePipe cameraStream pipe.Writer
    let reading = readPipe pipe.Reader
    do! Task.WhenAll(reading, writing) }

There are several changes in the core of the code implementation.  The function processFrame, as the previous implementation, grasps the stream from the HTTP response received by the Camera to process the video stream. However, notice that the array of bytes, like frameHeader, and the relative operations, like findStreamDelimiter, are using the Span<byte> type to reduce allocations. In particular, the function findStreamDelimiter, “slices” the array of bytes for comparison and index offsetting instead of generating new arrays. This technique provides some benefits, but there is more.

Later in the same function processFrame, the pipe instance of the Pipe type (from the System.IO.Pipelines namesapce) is roughly comparable to a MemoryStream, with the only (huge) difference being able to rewind it many times, the data is treated like a traditional FIFO queue. In general, you can think the Pipe as a buffer that sits between a high performant producer/consumer, where we have a producer pushing data in at one end, and a consumer that pulls the data out at the other side. 

In this particular implementation, the IO read and write operations on pipes are asynchronous, so we pass a PipeWriter instance to the writing  function, which does our writing, and an instance of the PipeReader to the reading function that does our reading. Then, we wait asynchronously in the Task.WhenAll method that the writing the data calls Complete() on the PipeWriter.

The pipelines pipe of our video streaming reader has two asynchronous functions:

  • writePipe reads asynchronously from the HTTP response stream, and then writes into the PipeWriter
  • readPipe reads asynchronously from the PipeReader and parses/decodes incoming images


Unlike the original implementation, there are no explicit Buffer.BlockCopy calls and buffers allocated anywhere. The impact is enormous, reducing memory allocation and in some aspects, improving the CPU utilization. This is the main purpose of exploiting Pipelines. In addition, the code is simpler and easier for the developer to focus solely on the business logic instead of complex buffer management.

NOTE: In this implementation, to simplify the access and interop of the System.IO.Pipelines asynchorouns operation, we use the task {} computation expression in place of the idiomatic F# async {} computation expression. The reason is that direct utilization of the task-based operations, without converting them into an F# Async type, produce better performance. For more details see this link

In a more in-depth analysis of the code, the function writePipe starts with calling the GetMemory(int) method of the underlying PipeWriter instance to get memory available.  Then, the Advance(int) method of the PipeWriter instance notifies the PipeWriter the amount of data that is written to the buffer.  Next, it is important to call the PipeWriter.FlushAsync(), which makes the data available to the PipeReader in the function readPipe.

It is important to note, that the data we receive from the PipeWriter is passed without any extra allocation and data copying. The pipelines behave simply, but in a very sophisticated and intelligent way, as a buffer between the PipeWriter and the PipeReader without any need to copy data around.

The recursive function readPipe consumes the buffers written by the PipeWriter, which originates from the HTTP video stream. When the call to the PipeReader.ReadAsync completes, it returns a ReadResult type, which exposes two central properties; the data read in the form of ReadOnlySequence<byte> and the IsCompleted flag notifying when the PipeWriter reaches the end of the stream.  Then, the function findStreamDelimiter finds the end of the image boundary to parse and render the buffer. In this function, the arrays of bytes are sliced (Slice method of the Span<’a>) to avoid re-processing and allocating the same data. The GetPosition method of the ReadOnlySequence<byte> returns a relative position of the delimiter frameHeader passed, which defines the beginning of an image in the video stream.

Next, the method PipeReader.AdvanceTo completes a single write operation and notifies the PipeReader the quantity of data consumed. This function makes the data available in the pipe to be consumed by the PipeReader.

The underlying Pipe implementation persist a linked list of buffers that passes within the PipeWriter and PipeReader. For example, the PipeReader defines a ReadOnlySequence<’a> type as a view over a set of segments of ReadOnlyMemory<‘a>, similar to Span<’a> and Memory<’a>. In other words, the Pipe implementation keeps pointers of the location of the reader and writer in the global allocated data, and it updates them when the data is either written or read. 

Auto Back pressure handling 

Another important characteristic of pipelines is that they support and contend with back-pressure. 

In a perfect world, reading and processing streams of data run at the same speed, in perfect balance. However, in the real World, this scenario is very rare. Normally, processing and parsing chunks of data takes more time than just copying or moving blocks of data from the stream. Consequentially, the producer thread can easily overwhelm the consumer thread. The result is that the producer thread will have to either slow down, or allocate more memory to store the data for the consumer thread, which is not a sustainable long-term solution. For ideal performance, there should be an equilibrium between frequent pauses and allocating more memory. Pipe solves this problem by controlling the flow of data, regulating how much data should be buffered before call the PipeWriter.FlushAsync method, and determining how much the consumer has to process before the producer can resume.

For example, if the PipeReader is not able to process the data at the same speed as the PipeWriter, the reader can push the data back into the pipe explicitly identifying the length of what was read.  The PipeWriter adjusts its rate in response to this information.  This way the Pipe negotiates between the PipeReader and PipeWriter, preventing the PipeReader from being overwhelmed by the stream of incoming data.  On the other side, the PipeWriter writes the chunk of the data into the pipe, and then calls the flush method to ensure that the pipe applies back-pressure.   

Below is the output:

In terms of performance, the application runs with an average of 8% CPU consumption, and about 36Mb of memory pressure. 

Here is the code for the UI Xamarim Forms:

type StreamManager private () =
    static let instance = System.Lazy<_>(fun () ->  
            new Microsoft.IO.RecyclableMemoryStreamManager())
    static member Instance = instance.Value


type MainPage() =
    inherit ContentPage()

    let camersUrls = [
        "http://192.168.20.48/axis-cgi/mjpg/video.cgi"
        "http://192.168.20.49/axis-cgi/mjpg/video.cgi"
        "http://192.168.20.50/axis-cgi/mjpg/video.cgi"
        "http://192.168.20.51/axis-cgi/mjpg/video.cgi"
        ]

    let _ = base.LoadFromXaml(typeof)

    let cameraSources = 
        List.init camersUrls.Length (fun i -> new Image ( Aspect = Aspect.AspectFit ), Uri(camerasUrls.[i]))

    let credentials = new NetworkCredential("admin", "myPa55w0rd");

    let cameras = 
        cameraSources
        |> List.map(fun (image. url) -> CameraStreaming(image, credentials, url))

    let mainStack = base.Content :?> StackLayout
    mainStack.Padding <- new Thickness (0, 10, 0, 0)
    mainStack.VerticalOptions <- LayoutOptions.StartAndExpand
    mainStack.HorizontalOptions <- LayoutOptions.CenterAndExpand

    do
        for camera in cameras do
            mainStack.Children.Add(camera.Image)
            camera.Start() 

As you can see, in this case we are running the application with four different video IP-cameras. 

Performance tip: recycling MemoryStream

The .NET programming languages rely on a mark-and-sweep GC that can negatively impact the performance of a program that generates a large number of memory allocations due to GC pressure. This is a performance penalty that the previous code pays when creating a System.IO.MemoryStream instance for each Image, including its underlying byte array. 

The quantity of memory stream instances increases with the number of the chunks of data to process, which can be hundreds in a large stream. As that byte array grows, the MemoryStream resizes it by allocating a new and larger array, and then copying the original bytes into it. This is inefficient, not only because it creates new objects and throws the old ones away, but also because it has to do the legwork of copying the content each time it resizes. 

One way to alleviate the memory pressure that can be caused by the frequent creation and destruction of large objects is to tell the .NET GC to compact the large object heap (LOH) using this setting:

GCSettings.LargeObjectHeapCompactionMode = GCLargeObjectHeapCompactionMode.CompactOnce

This solution, while it may reduce the memory footprint of your application, does nothing to solve the initial problem of allocating all that memory in the first place. A better solution is to create an ObjectPool, also known as pooled buffers, to pre-allocate an arbitrary number of MemoryStream that can be reused.

Microsoft has released a new object, called RecyclableMemoryStream, which abstracts away the implementation of an ObjectPool optimized for MemoryStream, and minimizes the number of large object heap allocations and memory fragmentation. The discussion of RecycableMemoryStream is out of the scope of this article. For more information refer to the MSDN online documentation.

Here below is the output of the application processing fours video IP-camera streams

In terms of performance, the application runs almost exactly as the previous one with only one video stream. In this case, the application runs with the average of 9% CPU consumption, and about 51Mb of memory pressure.

The System.IO.Pipelines is part of the new .NET Core types whose aim is to improve performance by drastically reducing (almost zeroing) memory allocation.  The results garnered by implementing pipelines in my code far surpassed my expectations.  The phenomenal performance gains here have proven to be a valuable tool which I plan to implement in future applications.  

If you are interested in learning more about increasing performance in applications through the use of concurrency, multi-core parallelism, and distributed parallelism join me in Paris or London for my Concurrent Functional Programming in .NET Core course.  

ParisApril 25th-26th, 2019Link
LondonApril 29th-30th, 2019Link


Happy Holidays to you and your family, looking forward to wonderful new year with the vibrant F# community!  

Santa’s Super Sorter: Naughty or Nice?

This post is part of the fantastic F# Advent Calendar 2017 series organized by Sergey Tihon (@sergey_tihon) to bring the community together to celebrate the holiday season.  Be sure to check out the other posts!

The goal:  help Santa sort out who has been naughty or nice this Christmas !!

During this time of year Santa is overwhelmed, preparing presents for Christmas, and he is looking for helper elves to outsource some very important tasks.  He is asking for our help to design a program that can efficiently decide who has been naughty or nice this year.

The idea for this program is to evaluate a person’s tweets to determine if a given Twitter user has been Naughty or Nice.  This program will analyze the last year of tweets generated by the member.  The program uses the IBM-Watson Tone Analyzer service to interpret and analyze the tweet text making a qualitative determination of either naughty or nice.


Note: this program uses the last year of tweets, but you should be able to plug any other source of historical data; such as Facebook.  The program analyzes the emotions and tones of what people write online to identify whether they are happy, sad, hungry, and more. In this example Twitter was used because of its importance as a social media channel, the prolific availability of content from posts, reviews and messages from just about every well-known person on the planet.


This application gets data from Twitter and then reviews the data leveraging Watson’s cognitive linguistic analysis in order to identify a variety of tones at both the sentence and document level.  This service is able to detects three types of tones, including emotions anger, disgust, fear, joy and sadness.  It can also identify social propensities; such as, openness, conscientiousness, extroversion, agreeableness, and emotional range.  Finally, it detects language styles in the text such as analytical, confident or tentative. Using these metrics, the program fetches the historical tweets, runs the analysis and If it determines that there is a majority of anger or disgust compared to the level of joy, for example, it will put you on the naughty list.


ibmTo implement this project, we will use VSCode (with Ionide) and the dotnet-cli for cross-platform compatibility.  You can download the latest .NET Core SDK and find more details here.


The IBM-Watson services provides SDK, but this program will access the API directly using a regular HTTP request to remove any extra dependencies. This decision is based on the fact the IBM-Watson SDK are not yet fully compatible with the dotnet-core, and furthermore, because the API exposed are provided only in synchronous version, which adds more complexity to running multiple request at the same time. This program is written to leverage the asynchronous programming model, accessing the capabilities of the Tone Analyzer service via an HTTP Representational State Transfer (REST) API calls, to analyze multiple chunks of tweets in parallel.

The historical tweets are fetched using the Tweetinvi package, which provides a dotnet-core version of the library.


Here the steps to create the project.  The final implementation can be found here

  1. Create a new project with dotnet-core

                 dotnet new console -lang F# -o SantaListAnalyzer

  1. Then add the packages needed to run the program

                dotnet add package System.Net.Http

               dotnet add package System.Configuration.ConfigurationManager

               dotnet add package System.Text.RegularExpression

               dotnet add package Newtonsoft.Json

               dotnet add package TweetinviAPI

  1. Build the project, which allows ultimately to get code completion in VSCode

              dotnet build


Before you start coding, lets take care of the account set up.


IBM-Watson account set up:

IBM has tied Watson to the cloud development environment “Blue Mix”, which is a full-service suite of applications. We are interested in the Tone Analyzer, but there are other options available, you should take a look here

To have free access to the IBM cloud development environment, you need to register and create an account here

After the registration, you will receive an email to confirm the account generated, and then you are good to start.

The account gives you 2500 free calls per month, which is quite a large number to experiment and have fun with the API. You can find more information about the Tone Analyzer here


Twitter development account set up:

This tutorial uses tweets as the data source. To pull tweets programmatically from Twitter, you use the Twitter APIs, for which you need OAuth credentials. If you do not have a Twitter account, you can sign up here

Once you have a valid account, the next thing you need to do is to create an API key for your application. With your log-in active, head here

Get the access tokens by following the instructions here . When you are done, you should have the following four credentials: consumer key, consumer key secret, access token, and access token secret.


Tweetnvi library set up:

Tweetinvi is a .NET library used to access the Twitter REST API.

We will use the dotnet-core version, which can be used for development on different platforms. This library can be found here

We have already added the Tweetnvi package to the library using the dotnet command line.


Now you have all that you need to start coding.

Below is the implementation of the program broken out in parts for ease of explanation. The full code implementation can be found here

type ToneEmotionScores =
    { anger:float32; disgust:float32; fear:float32; joy:float32; sadness:float32 }
    with static member Zero = { anger=0.f; disgust=0.f; fear=0.f; joy=0.f; sadness=0.f }
         static member (+) (toneA, toneB) =
            { anger = (toneA.anger + toneB.anger) / 2.f
              disgust = (toneA.disgust + toneB.disgust) / 2.f
              fear = (toneA.fear + toneB.fear) / 2.f
              joy = (toneA.joy + toneB.joy) / 2.f
              sadness = (toneA.sadness + toneB.sadness) / 2.f }

The ToneEmotionScores is a record type that carries the tone score for different emotions. The Zero static member and the (+) overloading are used to define “monoid”[1] properties. These properties ease the aggregation of multiple ToneEmotionScores types resulting from the execution of parallel operations. The pattern used is called fork/join, which will be further explained. In this case, the plus (+) operator is associative (and commutative), which guarantees a deterministic aggregation of parallel operations, because the order of computation is irrelevant. You can find more information in chapter 5 “Data Parallelism” my book (link here).


NOTE In functional programming, the mathematical operators are functions. The + (plus) is a binary operator, which means that it performs on two values and manipulates them to return a result. A function is associative when the order in which it is applied does not change the result. This property is important for reduction operations. The + (plus) operator and the * (multiply) operator are associative because:

(a + b) + c = a + (b + c)

(a * b) * c = a * (b * c)

A function is commutative when the order of the operands does not change its output, so long as each operand is accounted for. This property is important for combiner operations. The + (plus) operator and the * (multiply) operator are commutative because:

a + b + c = b + c + a

a * b * c = b * c * a

Why does this matter?

This matters because, using these properties, it is possible to partition the data and have multiple threads operating independently on their own chunks, achieving parallelism, and still return the correct result at the end. The combination of these properties permits the implementation of a parallel pattern like divide-and-conquer, Fork/Join, and MapReduce.


Monoids:  Using math to simplify parallelism

The property of association leads to a common technique, known as a monoid (https://wiki.haskell.org/Monoid), which works with many different types of values in a simple way. The term monoid (not to be confused with monad https://wiki.haskell.org/Monad) comes from mathematics, but the concept is applicable to computer programming without requiring any background in math. Essentially, monoids are operations whose output type is the same as the input, and which must satisfy some rules: associativity, identity, and closure.


Here we have defined the discriminated unions Emotions and SantaList, which are used to handle the different tone emotion cases and to apply the final result of the evaluation; whether you have been Naughty or Nice.

type Emotions =
    | Anger
    | Fear
    | Disgust
    | Joy
    | Sadness

type SantaList =
    | Nice
    | Naughty

Next, we define a few helper functions used to clean up the Tweets to facilitate the tone analysis. The maxSizeSentence is a value used to constrain the max text length allowed to send to the IBM-Watson API.  The other values are used to initialize the credential to access both the IBM-Watson and Twitter development API.

let [<Literal>] maxSizeSentence = 30720
let regx_tweethandle = Regex("@\w+", RegexOptions.Compiled ||| RegexOptions.IgnoreCase)
let regx_hash = Regex("#\w+", RegexOptions.Compiled ||| RegexOptions.IgnoreCase)
let regx_url = Regex("http[^\s]+", RegexOptions.Compiled ||| RegexOptions.IgnoreCase)

let consumerKey = ConfigurationManager.AppSettings.["ConsumerKey"]
let consumerSecret = ConfigurationManager.AppSettings.["ConsumerSecret"]
let accessToken = ConfigurationManager.AppSettings.["AccessToken"]
let accessTokenSecret = ConfigurationManager.AppSettings.["AccessTokenSecret"]
let usernameWatson = ConfigurationManager.AppSettings.["usernameWatson"]
let passwordWatson = ConfigurationManager.AppSettings.["passwordWatson"]
let baseWatsonURL = "https://gateway.watsonplatform.net/tone-analyzer/api/v3/tone?version=2016-05-19&sentences=false"

do Auth.SetCredentials(new TwitterCredentials(consumerKey, consumerSecret, accessToken, accessTokenSecret))

This function naughtyOrNiceSelector, as you can imagine by the name, is responsible to calculate if a twitter handle has been either naughty or nice. In this code, we are simply verifying if the last year of tweets for a user contains more anger and disgust in the tone as compared to a joyful tone.

let naughtyOrNiceSelector (tones:ToneEmotionScores) =
    match tones with
    | {anger=anger;disgust=disgust;joy=joy} when anger + disgust >= joy -> Naughty
    | _ -> Nice

The following function getTweetHistory fetches the tweets from the last 12 months. Because the API can fetch a max of 3200 tweets per request, we are recursively sending a request keeping track of the time for the previous request, and then subtracting the time of the last tweet obtained until all the tweets from one year period have been retrieve. In this way, we are able to collect all the tweets, even if the given twitter handle has produced more than 3200 tweets in the past year. The result of this function is a set of tweet chunks, where each chunk could have a max number of 3200 tweets.

let getTweetHistory (batch:int) (userId:string)  =
    let tweetsToFetch = DateTime.Now
    let rec fetchTweets (tweets:ITweet list) =
        let tweetsCount = tweets |> List.sortByDescending(fun t -> t.CreatedAt) |> List.last
        if tweetsCount.CreatedAt >= (tweetsToFetch.AddMonths(-12)) then
           let idOfOldestTweet = tweets |> List.map(fun t -> t.Id) |> List.min
           let timelineRequestParameters = UserTimelineParameters(MaxId = int64(idOfOldestTweet - 1L),MaximumNumberOfTweetsToRetrieve = batch)
           let lastTweets = Timeline.GetUserTimeline(userId, timelineRequestParameters) |> Seq.toList
           fetchTweets (lastTweets @ tweets)
        else tweets
        let lastTweets = Timeline.GetUserTimeline(userId, batch) |> Seq.toList
        if (lastTweets |> List.sortByDescending(fun t -> t.CreatedAt) |> List.last).CreatedAt >= (tweetsToFetch.AddMonths(-12)) then
            fetchTweets lastTweets
        else
            lastTweets

The function tweetCleanup aims to clean up the mined tweet data. In fact, the tweet text could potentially, and most likely, contain several strings that should not be considered for any textual analysis. For example, the word “RT” is not relevant for sentiment analysis, neither are phrases that represent URLs. In this step, clean up the tweet text so that the Watson services can analyze the text better.

let tweetCleanUp (tweets:ITweet list) =
    tweets
    |> List.map(fun t -> t.Text)
    |> List.map(fun t -> regx_tweethandle.Replace(t, ""))
    |> List.map(fun t -> regx_hash.Replace(t, ""))
    |> List.map(fun t -> regx_url.Replace(t, ""))
    |> List.map(fun t -> t.Replace("RT", "").Replace("\"", "\\\""))
    |> List.map (System.Web.HttpUtility.JavaScriptStringEncode)

The following functions tweetToAnalyzeMerger and tweetPartitioner, respectively aggregate all the tweet chunks together and then partition the merged data into tailored string chunks. This size of each portion of text is scoped not exceed the max value “maxSizeSentence” that the IBM-Watson service can analyze at one time.

let tweetToAnalyzeMerger tweets =
     List.foldBack(fun (tweet:string) acc ->
           let tweets = tweet.Trim().Split([|Environment.NewLine|], StringSplitOptions.RemoveEmptyEntries)
           let tweets = tweets |> Array.filter(String.IsNullOrWhiteSpace >> not)
           if tweets.Length = 0 then acc
           else (String.Join(". ", tweets)::acc)) tweets []

let tweetPartitioner (tweetsToAnalyze:string list) =
    let rec partitionTweets (tweetsToAnalyze:string list) acc =
         match tweetsToAnalyze with
         | [] -> acc
         | tweets -> let tweetChunk, tweetsRemaining = partitionSubTweets tweets []
                     partitionTweets tweetsRemaining (tweetChunk :: acc)
        and partitionSubTweets (tweetsToAnalyze:string list) (acc:string list) =
         match tweetsToAnalyze with
         | head::tail when head.Length + (acc |> List.sumBy(fun s -> s.Length)) <= maxSizeSentence -> partitionSubTweets tail (head::acc)
         | tweets -> (String.Join(". ", acc), tweets)
    partitionTweets tweetsToAnalyze []

The following function emotionAnalyzer is the final and the core piece of the program. In fact, this function connects and feeds the Tone Analyzer to get an analysis of all the tweets passed and derive scores for the sentiments expressed in the text.

The set of “tweetChunks” are passed into a Seq.map function to transform the input sequence into a sequence of Async types, which are processed in parallel using the Async.Parallel operator.

As mentioned, because the result type of these operations is represented by a ToneEmotionScores type, which has monodoial properties, we can merge the results simply with the Array.reduce(+) function.

let toneScoresEvaluator (emotionTone:Emotions) (tones:JEnumerable<JToken>) =
     tones
     |> Seq.find(fun tone -> tone.["tone_name"].ToString() = emotionTone.toString)
     |> fun score -> score.["score"] |> float32

let emotionAnalyzer (tweetChunks:string list) =
     tweetChunks
     |> Seq.map(fun tweetChunk -> async {
            let data = sprintf "{\"text\": \"%s\"}" tweetChunk
            let request = WebRequest.Create(baseWatsonURL)
            let auth = sprintf "%s:%s" usernameWatson passwordWatson
            let auth64 = Convert.ToBase64String(Encoding.ASCII.GetBytes(auth))
            let credentials = sprintf "Basic %s" auth64
            request.Headers.[HttpRequestHeader.Authorization] <- credentials
            request.Method <- "POST"
            request.ContentType <- "application/json"
            let byteArray = Encoding.UTF8.GetBytes(data)
            request.ContentLength <- int64 byteArray.Length
            use! dataStream = request.GetRequestStreamAsync() |> Async.AwaitTask
            do! dataStream.AsyncWrite(byteArray, 0, byteArray.Length)
            let! response = request.AsyncGetResponse()
            use responseStream = response.GetResponseStream()
            use reader = new StreamReader(responseStream)
            let! responseFromServer = reader.ReadToEndAsync() |> Async.AwaitTask
            let resultAnalisys = JObject.Parse(responseFromServer).ToString()
            let docTone = JObject.Parse(resultAnalisys)

            let categories = docTone.["document_tone"].["tone_categories"] :?> JArray
            let emotion_tones = categories.Children() |> Seq.find(fun ch -> ch.["category_id"].ToString() = "emotion_tone")
            let tonesJ = emotion_tones.["tones"].Children()
            return { anger = tonesJ |> toneScoresEvaluator Anger
                     fear = tonesJ |> toneScoresEvaluator Fear
                     disgust = tonesJ |> toneScoresEvaluator Disgust
                     joy = tonesJ |> toneScoresEvaluator Joy
                     sadness = tonesJ |> toneScoresEvaluator Sadness }})
        |> Async.Parallel
        |> Async.RunSynchronously
        |> Array.reduce(+)

The asynchronous tone analysis operations run in a fork/join fashion, which is a pattern that aims to split, or fork, a given data set into chunks of work so that each individual chunk of work is executed in parallel. After each parallel portion of work is completed, the parallel chunks are then merged, or joined, together..The Fork/Join pattern splits a task into subtasks that can be executed independently in parallel. Then, when the operations complete, the subtasks are joined again. It is not a coincidence that this pattern is often used to achieve data parallelism. In fact, there are clearly some similarities. Ultimately, the last a point-free function [2] naughtyOrNiceAnalisys composes all the previous defined functions together to run the analysis.

In this case the tweets are retrieved in batches of 1000, but this is an arbitrary number that can be changed.

let naughtyOrNiceAnalisys =
    getTweetHistory 1000 >> tweetCleanUp >> tweetToAnalyzeMerger >> tweetPartitioner >> emotionAnalyzer >> naughtyOrNiceSelector
>> function
   | Nice -> printfn "Congratulations!! It looks like you will be having a very Merry Christmas this year!"
   | Naughty -> printfn "Santa's elves report that you have been naughty this year, its not too late to start behaving!"

Well done!  Now, let’s run the program and check who has been Naughty or Nice this year….

    naughtyOrNiceAnalisys "trikace”


What about Don Syme  ??? try it yourself to check ..!!!

    naughtyOrNiceAnalisys "dsyme”


Enjoy and Happy holidays!!!!


[1] https://en.wikipedia.org/wiki/Monoid

[2] https://wiki.haskell.org/Pointfree

Concurrency in .NET : Modern patterns of concurrent and parallel programming

Announcing 2 days deep dive training course in writing concurrent and distribute system in .NET

This course is a hands-on workshop will explore the powerful and accessible tool of parallel computation. This course teaches how to optimize and maximize performance of an application, and how to most effectively use multi-core computation, which is used across a range of industries and applications.

Become the master of the multicore domain. Learn how to harness the powers of parallel computation and multicore computation to dominate peer applications in finance software, video games, web applications and market analysis. To yield the most performance, computer programmers have to partition and divide computations to maximize the performance while taking full advantage of multicore processors. Start your path from Padawan to Jedi.

After this workshop, you will be ready to return to work and have code bend to your will. This course introduces you to technologies and tools available to developers at every level who are interested in achieving exceptional performance in applications.

This course is an intensive workshop in writing readable, more modular, and maintainable code in both C# and F#. These languages function at peak performance with fewer lines of code, resulting in increased productivity and successful programs. Ultimately, armed with new found skills, attendees will gain the knowledge needed to become experts at delivering successful, optimized, high-performance solutions. These solutions can adapt resource consumption, whether running locally, on OnPrem, or on Cloud infrastructures.

In this course, participants will have hands-on practice designing projects. By the end of the course, participants will know how to build concurrent and scalable programs in .NET using the functional paradigm.


See you there!!

Course details


The Traveling Santa Problem… a Neural Network solution

Once again the fantastic “F# Advent Calendar” organized by Sergey Tihon arrived bringing a festive spirit to all the F# enthusiasts.

The goal… helping Santa

This time, Santa has sent for help from his F# elves to help deliver toys to all the good boys and girls of the world. This year Santa is in a race to outpace all the Amazon drones and Jet deliveries, and is asking for our help to design the most efficient and effective flight path for his sleigh given a number of cities. This problem follows the format of the Traveling Salesman Problem. We will utilize Artificial Neural Network to design the perfect solution based on Elastic-Network learning algorithm.

The TSP is a combinatorial problem that involves Santa’s quest to visit a given number of cities and identifying the shortest path to travel between the cities. In addition, Santa is allowed to start and end the route from any city, but he can visit each city only once.


At first, this may not look like a complex program to solve, however, the number of possible combinations can dramatically (factorial) increase with the growth of the number of cities. For example, in the case of two cities the solution is only 1 path, with 5 cities there are 120 possible combinations, with 50, well… we have 30414093201713378043612608166064768844377641568960512000000000000 possible combinations. Understandably, a brute-force approach is not recommended, or Santa will be stuck in “recalculating” mode waiting on his MapQuest to come up with a route to deliver presents.

The Elastic Network we will use is a type of artificial neural network which utilizes unsupervised learning algorithms for clusterization problems and treats neural networks as a ring of nodes. The learning process keeps changing the shape of the ring, where each shape represents a possible solution.


Starting with Machine Learning

Machine learning is a fascinating and trendy topic these days, but like many other technologies it has its own terminology such as entropy error, resubstitution accuracy, linear and logistic regression that can sound intimidating at first.  Don’t let these terms turn you away, the effort you put into understanding Machine learning will be returned three fold.

In the last few months, I have started experimenting with and applying machine learning in different domains, including Natural Language Generation. In my work at STATMUSE, I am developing a Natural Language Processing back-end infrastructure in F# to provide Natural Language Interfaces for sports statistics. Check out this video to see a project interacting with Alexa (Amazon echo)

Thankfully, if you are a .NET developers, there many great resources to get more familiar with the topic. To name a few:


What’s the challenge?

In my opinion, the main challenge is figuring out how to map problems to a machine learning algorithm; as well as, how to choose the right machine learning algorithm to use. To help, the Microsoft Azure Machine Learning Team put together a very useful cheat-sheet here.

What really brought things home for me was seeing a video about Neural Networks in which James McCaffrey mentioned Neural Network as a Multi-Purpose machine learning algorithm!  See the video that spurred my revelation here.


What is a neural network?

An Artificial Neural Network (ANN) is an algorithm designed for pattern recognition and classification and can be used in many applications. Simply said, an ANN is composed by an interconnected set of artificial neurons. Even more fascinating is that computations are modeled and inspired after the biological brain in this learning algorithm, which can be applied to classification, recognition, prediction, simulation and many other different tasks.

Here, neurons are organized in sub-sets, called layers, where all the neurons in one layer are connected to all the neurons in the following layers.

For example, the following figure shows a three layered artificial neural network. The neurons from the first layer are propagated through the network and connected into to the second layer, and second to the third.

from the figure, a fully connected neural network with 3 inputs (the blue nodes), 4 nodes in the hidden layer (the green ones), and 2 nodes as outputs (the orange ones) has (3 * 4) + 4 + (4 * 2) + 2 = 26 weights and biases.  

The result of the ANN, referred to as output, relies on the weights of the connections between neurons. The most important concept is that ANN is capable of self-training to output distinct values determined by a particular given input.

The training of a neural network aims to find the values for the weights and biases that can be used to evaluate a set of given known inputs and outputs. The secret of a Neural Network is computing the most correct weight values. However, the Neural Network has to be trained to generate these values, which at the beginning are unknown.


Good News !

So, for the functional programmer enthusiast, you can think of a neural network as a mathematical function that accepts numeric inputs and generates numeric outputs.  Although, the value of the outputs is determined by other factors such as the number of layers, the activation functions, and the weights and bias values. Activation functions are used by the neurons to evaluate the inputs and calculate a relative output.

Neural Newark is fast!

Considering that ANNs are modeled after the biological brain, which in the case of a humans, means there are 10^16 synapses to execute multiple operations with a minimal energy.  Theoretically, ANNs could, achieve the same kind of performance, very impressive.

Neural Network can be faster… can run in parallel

The only thing more impressive than utilizing ANNs would be utilizing ANNs on a multicore platform applying concurrency…  That combination could effectively take Santa throughout the galaxy.


NOTE If you want to learn more on how to apply concurrency in your programming check out my book “Functional Concurrency in .NET”

It is time to code!

First, we are going to define each part that composes a ANN. Each component to compose the NN is defined using a RecordType. Ultimately we will run a benchmark to compare the sequential implementation, the parallel implementation with the variant of using the new F# 4.1 feature Struct RecordType.  More here

In F# 4.1, a record type can be represented as a struct with the [<Struct>] attribute. This allows records to now share the same performance characteristics as structs, without any other required changes to the type definition.


The User-Interface is all in F#

The User-Interface is WPF based, which implementation uses the FsXaml Type-Provider 

The graphic and animation are generated using the charts from FSharp.Charting library, specifically, the LiveChart


Neuron

type Neuron =

{ inputsCount : int

  output:float

  threshold:float

  weights : float array }

member this.item n = this.weights |> Array.item n
 

module Neuron =

let create (inputs : int) =

let inputs = max 1 inputs

{ inputsCount = inputs

threshold = rand.NextDouble() * rangeLen

output = 0.

weights = Array.init inputs (fun _ -> rand.NextDouble() * rangeLen  ) }


let compute (neuron : Neuron) (input : float array) =

let weigths = neuron.weights

[ 0..neuron.inputsCount - 1 ] |> Seq.fold (fun s i -> s + abs (weigths.[i] - input.[i])) 0.

The neuron is basic unit in a Neural Network. Each Layer in the ANN has a set of Neurons connected to the Neurons of the neighborhood layers, if any. In our ANN model, a Neuron contains the count of inputs and the output value, which is computed as the distance between its weights and inputs. More important, the weights array is used to train the NN to compute the best result.

The Neuron weights are initialized with random values, and successively updated in each iteration. The Threashold is a single value weight that can be used for Matrix operations, but irrelevant in our scenario.


Layer

type Layer =

{

neuronsCount : int

inputsCount : int

neurons : Neuron array

output : float array

}

member this.item n = this.neurons |> Array.item n


module Layer =

let create neuronsCount inputsCount =

let neuronsCount = max 1 neuronsCount

{ neuronsCount = neuronsCount

inputsCount = inputsCount

neurons = Array.init neuronsCount (fun i -> Neuron.create inputsCount)

output = Array.zeroCreate<float> neuronsCount }


let compute (inputs : float array) (layer : Layer) =

let neuronsCount = layer.neuronsCount

let output = Array.Parallel.init neuronsCount (fun i -> Neuron.compute layer.neurons.[i] inputs)

{ layer with output = output }

A layer is simply a collection of Neurons of a same type. To solve the Traveling Santa Problem, only a single layer is needed. The compute function re-evaluates the output of each neuron, which is an array operation that can be parallelized.

Since a ANN requires a considerable number of Array operations to compute results, it is very suitable for implementation in a parallel programming model making the tasks considerably faster in a multi-processor environment.

The F# Array module used, provides Parallel functionality, which can is used to distribute processor intensive work to all processors and threads on the system.


Network

type Network =

{

inputsCount : int

layersCount : int

layers : Layer array

ouputLayer : Layer

activation : Activation

output : float array

}

member this.item n = this.layers |> Array.item n


module Network =

let create inputsCount layersCount =

let layers = Array.init layersCount (fun _ -> Layer.create layersCount inputsCount)

{

inputsCount = inputsCount

layersCount = layersCount

layers = layers

ouputLayer = layers |> Array.last

activation = Activation.sigmoidActivation

output = [||]

}

 
let compute (network : Network) (input : float array) =

let layers = network.layers |> Array.Parallel.map(Layer.compute input)

{ network with layers = layers; ouputLayer = layers |> Array.last ; output = (layers |> Array.last).output }
 

let foundBestOutput (network : Network) =

network.ouputLayer.output

|> Seq.mapi(fun i o -> i,o)

|> Seq.minBy (fun (_, o) -> o)

|> fst

The Network is a record-type that contains and wraps the Layers of the NN. The compute function runs the re-computation of each underlying layers, which also in the case, the operation can be parallelized using the F# Array.Parallel module.


ElasticLearning

type ElasticLearning =

{ learningRate : float

learningRadius : float

squaredRadius : float

distance : float array

network : Network }


module NetworkLearning =

let create (network : Network) =

let neuronsCount = network.ouputLayer.neuronsCount

let delta = Math.PI * 2.0 / (float neuronsCount)


let rec initDistance i alpha acc =

match i with

| n when n < neuronsCount ->

let x = 0.5 * Math.Cos(alpha) - 0.5

let y = 0.5 * Math.Sin(alpha)

initDistance (i + 1) (alpha + delta) ((x * x + y * y)::acc)

| _ -> acc |> List.toArray

// initial arbitrary values

{ learningRate = 0.1

learningRadius = 0.5

squaredRadius = 98.

distance = initDistance 0 delta []

network = network }


let setLearningRate learningRate (learning : ElasticLearning) =

{ learning with learningRate = max 0. (min 1. learningRate) }


let compute (learning : ElasticLearning) (input : float array) =

let learningRate = learning.learningRate

let network = Network.compute learning.network input

let bestNetwork = Network.foundBestOutput network

let layer = network.ouputLayer


System.Threading.Tasks.Parallel.For(0, layer.neuronsCount - 1, fun j ->

for j = 0 to layer.neuronsCount - 1 do

let neuron = layer.item j

let delta = exp (-learning.distance.[abs (j - bestNetwork)] / learning.squaredRadius)

for i = 0 to neuron.inputsCount - 1 do

let n = (input.[i] - neuron.item i) * delta

neuron.weights.[i] <- neuron.weights.[i] + (n + learningRate)

) |> ignore

The ElasticLearning is an unsupervised learning algorithms, which desired output is not known on the learning stage, which lead to best result rather the perfect. The initialization (create function) sets some predefined arbitrary values. In the application, these values are configured in the WPF UI.

The “learning rate” value determinates how much each weight value can change during each update step, and can impact the training speed. A bigger value increases the speed of training but also increment hazard of skipping over optimal and correct weight values.

The compute function is used to train and to make the NN system learn from the updated weights, the inputs and the delta, which is measured according to the distance of the bestNetwork. The Array operation can be run in parallel updating the each Neuron weights values.


TravelingSantaProblem

type TravelingSantaProblem(neurons:int, learningRate:float, cities:(float*float)[]) =

let foundBestPath iterations = asyncSeq {

let network = Network.create 2 neurons

let trainer = NetworkLearning.create network

let fixedLearningRate = learningRate / 20.

let driftingLearningRate = fixedLearningRate * 19.

let input = Array.zeroCreate<float> 2

let iterations = float iterations

let citiesCount = cities.Length

let lenNeurons = neurons

let path = Array.zeroCreate<(float * float)> (lenNeurons + 1)


let getNeuronWeight (trainer:ElasticLearning) n w =

(trainer.network.ouputLayer.item n).item w


for i = 0 to (int iterations - 1) do


let learningRateUpdated = driftingLearningRate * (iterations - float i) / iterations + fixedLearningRate

let trainer = NetworkLearning.setLearningRate learningRateUpdated trainer

let learningRadiusUpdated = trainer.learningRadius * (iterations - float i) / iterations

let trainer = NetworkLearning.setLearningRadius learningRadiusUpdated trainer


let currentStep = rand.Next(citiesCount)

input.[0] <- cities.[currentStep] |> fst

input.[1] <- cities.[currentStep] |> snd

let trainer = NetworkLearning.compute trainer input


let path = Array.Parallel.init (lenNeurons) (

fun j -> if j = lenNeurons - 1

then ((trainer.network.item 0).item 0).item 0, ((trainer.network.item 0).item 0).item 1

else ((trainer.network.item 0).item j).item 0, ((trainer.network.item 0).item j).item 1)


yield ((int iterations - 1), path)

}

The TravelingSantaProblem type has a single function foundBestPath, which execute the Neural Network algorithm by performing the computation of the ElasticLearning, and yielding an updated path for each iteration. The code is quite self-explanatory, it glues each components of the Neural Network and computes them to obtain the best path result. The function uses the FSharp.Control.AsyncSeq (details hereto yield asynchronously each updated path, which is used to update the LiveChart.


Here below the partial code of the main WPF ViewModel.


let pathStream = Event<(float * float)[]>()

let pathObs = pathStream.Publish |> Observable.map(id)


let pointsStream = Event<(float * float)[]>()

let pointsObs = pointsStream.Publish |> Observable.map id


// more code here


let livePathChart = LiveChart.Line(pathObs)

let livePointsChart = LiveChart.Point(pointsObs)

let chartCombine = Chart.Combine([livePointsChart; livePathChart]).WithYAxis(Enabled=false).WithXAxis(Enabled=false)

let chart = new ChartControl(chartCombine)

let host = new WindowsFormsHost(Child = chart)


// more code here


let updateCtrl ui  (points : (float * float)[]) = async {

do! Async.SwitchToContext ui

pathStream.Trigger points  }


// more code here


this.Factory.CommandAsync((fun ui ->

async { let updateControl = updateCtrl ui

let tsp = TravelingSantaProblem(neurons.Value,learningRate.Value,cities)

do! updateControl i path }), token=cts.Token, onCancel=onCancel)

The implementation of the Neural Network to help Santa is done.  But lets take a look at the performance.


Benchmarking

Now, is time to benchmark and compare the sequential version of the NN with the parallel implementation that has been shown previously. In addition, we are comparing the performance of the same NN implementation but with the adoption of the new Struct RecordType introduced in F# .4.1. Here the graph of the benchmark.

The test has been executed on a 8 logical cores machine, and the Neural Network settings are:

  • Cities : 150
  • Neuron: 50
  • Itertaion: 30000
  • Learning Rate : 0.5

The parallel versions of the NN with Struct RecordType is the fastest.

The Neural Network that uses Reference RecordType produces (and updates) a large number of neuros, which increases the number of short-living objects in memory. In this case, the Garbage Collector is forced to perform several generations, which is impacting the performance negatively.


You can found the complete code implementation here.

The implementation is WPF based, but in the App.fs file you can uncomment some code to run the program as a console project.


In conclusion, I am far from being capable of building a self driving car or a Cyberdyne Systems series T-800 (aka Terminator), but ANN is not as complex as I had once thought.


What’s next?

I will speak at LambdaDays 2016  (here more details) “Fast Neural Networks… a no brainer!“, if you are in the are .. Please stop by and say !

I will talk about how to develop a fast Neural Network using a parallel K-Means algorithm for the training and leveraging GP-GPU.


This solution in the end ensures a Merry Christmas for all and for all a Happy New Year!

“The Ugly Duckling” – A Little Story About Functional Programming

Functional Programming has been around for possibly as long as the fable of the “ugly duckling”. The impetus for FP started in the 1930s thanks to Alonzo Church, a mathematician best known for formulating lambda calculus, a formal theory for expressing computation based on function abstraction and application using variable binding and substitution. The syntax and behavior of most programming languages today reflect this model. This early origin means that Functional Programming is a paradigm that existed from ideas older than the first programmable computer. Since then, functional languages have introduced several concepts later adopted by other languages. In 1950 the first functional language, Lisp came into use.

In 1959, in response to memory issues found in Lisp, John McCarty invented the Garbage Collector. Forty years later, mainstream languages such as Java and C# adopted the Garbage Collector. In 1960, the concept of first-class function was coined by Cristopher Strachey, who also invented the term currying, one of the fundamental principles of FP. In 1973, the functional language ML introduced the concepts of Type-Inference and parametric polymorphism. Forty years later these same concepts were introduced as “Generics” in mainstream languages. So as the story of the “ugly duckling” goes, a concept that initially was seen as strange and different eventually came into its prime. For FP that time is now because of its ability to maximize multicore core platforms.
In 1954 Fortran, the first imperative language was introduced in the market, and a year later Cobol, one other imperative language made its first appearance. Both these languages have had an enormous success in the software business world to the point that the imperative paradigm dominated the industry for thirty years.

In the 1970s, there was the need and interest in the Software industry for different and more practical solutions to solve increasingly complex problems. The rise of the Object-Oriented paradigm came from the growing demand for an improved programming model.
Since then, the OO has increasingly matured and evolved, today this paradigm is widely accepted by enterprises and has become the most popular paradigm in use.
The technology world is in a continuous and unstoppable evolution, the natural consequence of this expansion is more complex computing problems. Industry is realizing that FP is better than OO because of its declarative and expressive coding style. FP’s mathematical approach promotes immutability and functions without side effects allowing the programmer to solve the full spectrum of problems in less time and with less bugs. FP addresses computational problems in a manner similar to mathematics, ensuring the correctness of the program.

An increasing number of programming languages support the functional paradigm including C#, C++, Java and Python. In 1994, Python introduced support of lambda expression and list comprehension for data manipulation. Likewise, C# from the beginning has supported a functional paradigm for program writing, but the complexity of doing so has prevented programmers from using it. In 2007, C# 3.0 introduced first-class functions in the language and new constructs such as lambda expression and type inference to allow programmers to introduce functional programming concepts. Soon to follow was LINQ (Language Integrate Query), which permits a declarative programming style. More recently, in 2010, Microsoft introduced F# as a supported functional language in the .NET ecosystem. The latest generation of functional languages is impure because they allow side effects; the result of this variation is a reduced learning curve for those who embrace this paradigm for the first time. To combat unwanted side effects, the most successful implementation of functional languages today are “hybrids”. These functional languages bridge the gap between object oriented and functional paradigms allowing both programming styles.

If the current job demand is an indication of the future, interest in utilizing Functional Programming in applications will continue to increase, and so will the need for programmers who can bring this paradigm to business solutions.

Solving the Santa Claus Problem in F#


Christmas is no doubt my favorite time of the year; there is something magical about the holidays. To be true to this festive time of year, I was looking for a good topic to share on the fantastic “F# Advent Calendar 2015” organized by Sergey Tihon

Immediately, a paper that I read a little while ago came to mind.  It is from the title “Beautiful Concurrency” by Simon Peyton Jones (Microsoft Research, Cambridge May 1, 2007). You can download the paper here.

In this paper is a section titled “The Santa Claus Problem”, a well-known example originally introduced by John Trono in 1994. The Santa Claus problem provides an excellent exercise in concurrent programming. Trono published the exercise and provided a solution based on semaphores, designed for low-level mutual exclusion. While semaphores can and should be used to introduce concurrency concepts, they are not necessarily appropriate for writing concurrent programs.

Being that concurrent and parallel computing are areas of interest for me, I have decided to solve “The Santa Claus Problem” using F#.  Utilizing F# with it’s message passing semantic built in the MailboxProcessor will show the simplicity and readability that is possible to achieve by adopting these concurrent constructors.  Also, it is of course an appropriate and festive topic for the holiday season.

Here the running WPF Santa Claus Problem in F#

WPF Santa Claus Problem
 

INTRO

One of the main tenants of the functional paradigm is immutability. In computer programming, an object is immutable when it’s state cannot be updated after creation. In .NET for example, “Strings” are typically immutable objects.

Immutable objects are more thread-safe than mutable objects. Immutable data structures facilitate sharing data amongst otherwise isolated tasks in an efficient zero-copy manner. Functional programming excels in parallel computation for the reason that immutability is the default choice.  The real benefit is that no multi-thread access synchronization is necessary.

Using immutable objects in a programming model forces each thread to process against its own copy of data. Furthermore, it is completely safe to have multiple threads accessing shared data simultaneously if that access is read-only.

Immutability is a key concept to write lock free multithreaded software. One other critically important concept for writing lock-less concurrent code is natural isolation. In a multithreaded program, isolation solves the problem of “share of state” by giving each thread a copied portion of data to perform local computation.  When using isolation, there is no race condition because each task is processing an independent copy of its own data.  Isolation can be achieved by process isolation, which is based on independent and separate memory address space.

F# is a great functional-first multi paradigm programming language with powerful concurrent constructors, which provide an enormous boost to productivity. More over, The F# programming language, is naturally parallelizable because it uses immutably as default type constructor.  F# Async Workflow and MailboxProcessor (a.k.a. Agent) provides a simple concurrent programming model that is able to deliver fast and reliable concurrent programs, which are easy to understand.

The F# MailboxProcessor primitive is based on message passing also known as the “share nothing approach”. We will use these two contractors extensively to solve “The Santa Claus Problems”


The Problem

Santa Claus sleeps at the North Pole until awakened by either all nine reindeer collectively back from their holidays, or by a group of three out of ten elves.

In the case that Santa Claus is awakened by the reindeer, he harnesses each of them (9) to the sleigh to deliver the toys. When the toys have been delivered, Santa Claus then unharnesses the reindeer, and sends them off on vacation till next Christmas.

In the case that Santa Claus is awakened by a group of three or more elves, he meets them in his office to discuss the status of the toy production, solve existing problems and consult on toy R&D. When the meeting is over, Santa Claus allows the elves to go back to work. Santa should give priority to the reindeer in the case that there is both a group of elves and a group of reindeer waiting.  Marshalling the reindeer or elves into a group must not be done by Santa since his time is extremely valuable. 
One of the challenges of the Santa Clause problem is to ensure the order of execution by enforcing the rules mentioned. In fact, if Santa Clause is already consulting with elves in his office, the program should not allow any extra elves to join a group nor should Santa Clause be able to deliver the toys regardless of the number of reindeer available if he is occupied by the elves and vice versa.


Summary of Santa’s tasks

  • Santa Claus sleeps at the North Pole until awakened by either (a) all of the nine reindeer, or (b) a group of three out of ten elves.
  • If awakened by the group of reindeer, Santa harnesses them to a sleigh, delivers toys, and finally unharnesses the reindeer who then go on vacation.
  • If awakened by a group of elves, Santa shows them into his office, consults with them on toy R&D, and finally shows them out so they can return to work constructing toys.
  • A waiting group of reindeer must be attended to by Santa before a waiting group of elves.
  • Since Santa’s time is extremely valuable, marshaling the reindeer or elves into a group must not be done by Santa.


The Solution

F# is a functional language with exceptional support for Asynchronous Workflow and with built-in message passing semantics with the MailboxProcessor.

To solve the Santa Claus Problem, we are using a message passing semantics, which show how the lack of shared state can simplify concurrent programming. The solution design uses the MailboxProcessor to create independents units, each responsible to coordinate and to marshal the groups of Elves or Reindeers. Each group has to organize among themselves without help from a Santa thread. One Agent is responsible to coordinate the Reindeer queue for when the Reindeer come back from vacation, and a separate and independent Agent to coordinate the Elf queue for when the Elves need to consult with Santa and join the waiting room.

One of the benefits of a system built using agents, is that the coordination and the synchronization between various threads can be implemented easily without sharing of state and therefore without locks, which removes pitfalls such as deadlock, livelock, and starvation.

Distributed memory systems using the message passing semantic, are simpler to write and prove correctness and also easier to refactor.

For example, in the Santa Claus problem, the constraint of having only three elves at time to consult with Santa, is implemented by a separate Elf queue, decoupling the Santa and Elf code further than the shared memory solutions.

The concurrency primitives of F# can be used to develop a sophisticated solution to the Santa Claus problem. The main problem is to synchronize a set of threads, that can be either reindeer or elves, and to manage them atomically by ensuring that one group of elves or reindeer does not overtake another group.  This synchronization, by using the agent model, is particularly simple to ensure. 

To easily terminate the program, we are using a ‘cancellation token’, which is generated and injected for each Agent and Async Operation. When the last year of Christmas is reached as expected, the ‘cancellation token’ is triggered provoking the cancellation and stop of all the processes involved, and consequentially to fire up the function registered to cleanup the resources and do some logging.


// The cancellation token is used to stop the execution as a whole
// when the last Year of Christams is reached
let cancellationTokenSource = new CancellationTokenSource()
let cancellationToken = cancellationTokenSource.Token


// … reindeer function implementation
if Interlocked.Increment(startingYear) = theEndOfChristams then
   cancellationTokenSource.Cancel()


// … santaClausProblem function
cancellationToken.Register(fun () ->
    (queueElves :> IDisposable).Dispose()
    (allReindeers :> IDisposable).Dispose()
    (threeElves :> IDisposable).Dispose()
    (elvesAreInspired :> IDisposable).Dispose()
    (santasAttention :> IDisposable).Dispose()
    log "Faith has vanished from the world\nThe End of Santa Claus!!") |> ignore


BarrierAsync

The BarrierAsync is a type whose job is to provide a re-entrance barrier for multiple threads to synchronize on. The purpose of BarrierAsync is to eliminate the need for an explicit shared state among synchronization threads.


// The BarrierAsync is a block synchronization mechanism, which instead of using
// low-level concurrency to lock primitives, it is using a MailboxProcessor with
// asynchronous message passing semantic to process messages sequentially.
//  The BarrierAsync blocks the threads until it reaches the number of
// signals expected, then it replies to all the workers, releasing them to continue the work
type BarrierAsync(workers, cancellationToken, ?continuation:unit -> unit) =
    let continuation = defaultArg continuation (fun () -> ())
    let agent = Agent.Start((fun inbox ->
        let rec loop replies = async {
            let! (reply:AsyncReplyChannel<int>) = inbox.Receive()
            let replies = reply::replies
            // check if the number of workers waiting for a reply to continue
            // has reached the expected number, if so, the reply functions
            // must be invoked for all the workers waiting to be resumed
            // before continuing and restarting with an empty reply workers list
            if (replies.Length) = workers then
                replies |> List.iteri(fun index reply -> reply.Reply(index))
                continuation()
                return! loop []
            else return! loop replies }
        loop []),cancellationToken)
     
        interface IDisposable with
            member x.Dispose() = (agent :> IDisposable).Dispose()
            member x.AsyncSignalAndWait() = agent.PostAndAsyncReply(fun reply -> reply)

 
The purpose of the asynchronous barrier implementation is to suspend asynchronous workflow until the barrier rolls. This type is constructed with a given number of ‘workers’, which are threads that are blocked awaiting the barrier to roll, releasing the threads.
 

The implementation of the BarrierAsync is using a message passing approach with the F# MailboxProcessor to convert concurrently posted messages into a sequence of messages. The function ‘AsyncSignalAndWait’ is sending an asynchronous ‘PostAndAsyncReply’ request to the agent using a ‘AsyncReplyChannel’ type, which is blocking the Asynchronous Workflow until all the workers have signaled the Barrier, which is rolling and releasing the threads by replying back to the channel of each worker.

For example, the BarrierAsync is used to synchronize the “three elves at a time” constraint. The Elf threads share state in the form of a counter so that every third elf in the waiting room will go and wake Santa. Each time an elf needs help from Santa, he sends an ‘AsyncSignalAndWait’ to the BarrierAsync, when the workers counter reaches the expected number, in this case three, the Barrier rolls and replies to all the workers to continue.


 SyncGate

The SyncGate type, is to deliver a threads synchronization equivalent to a Semaphore, but with specific interest in targeting the asynchronous workflow. The purpose of the SyncGate is to allow a given number of an asynchronous workflow to run simultaneously, and blocking further requests until a running workflow sends a request of release to the SyncGate.  This type is constructed with a given number of ‘locks’, which is the number of threads that are allowed to execute in parallel. The remaining threads are put in a queue and blocked awaiting for the SyncGate to receive a release signal when an executing thread terminates the work.

The implementation of the SyncGate, like the BarrierAsync, is using a message passing approach with the F# MailboxProcessor. There are two functions exposed, respectively to ‘Acquire’ a lock asynchronously, and to ‘Release’ a lock.


For example, in the implementation of the “Santa Claus Problem”, there is a SyncGate representing Santa Claus. In this case the SyncGate is constructed with only one lock available, to ensure that Santa is awakened either by the ninth reindeer or each third elf.


type SynGateMessage =
   | AquireLock of AsyncReplyChannel<unit>
   | Release

// SynGate uses a MailboxProcessor to emulate the synchronization
// lock of a Semaphore maintaing the asynchronous semantic of F# Async Workflow
type SyncGate(locks, cancellationToken, ?continuation:unit -> unit) =
     let continuation = defaultArg continuation (fun () -> ())
     let agent = Agent.Start((fun inbox ->
         let rec aquiringLock n  = async {
         let! msg = inbox.Receive()
         match msg with
         | AquireLock(reply) ->  reply.Reply()
         // check if the number of locks aquisition
         // has reached the expected number, if so,
         // the internal state changes to wait the relase of a lock
         // before continuing
            if n < locks - 1 then return! aquiringLock (n + 1)
            else return! releasingLock()
         | Release ->    return! aquiringLock (n - 1) }
         
         and releasingLock() =
           inbox.Scan(function
                 | Release -> Some(aquiringLock(locks - 1))
                 | _ -> None)
     aquiringLock 0),cancellationToken)

     interface IDisposable with
       member x.Dispose() = (agent :> IDisposable).Dispose()
       member x.AquireAsync() = agent.PostAndAsyncReply AquireLock
       member x.Release() = agent.Post Release


The complete source code can be found here.

There are two implementations, one is a console application which logs the output into the console, the second one is a WPF application.
 

This solution in the end ensures a Merry Christmas for all and for all a good night!

Parallelizing Async Tasks with Dependencies

Design your code to optimize performance


A little while ago, I had the requirement to write a tool that could execute a series of Async I/O tasks; each with a different set of dependencies, which influenced the order of the operation. This can be addressed simply with sequential execution, however if you want to maximize the performance, sequential operations just wont do – you must build the tasks to run in parallel.
To optimize performance these tasks need to be scheduled based on the dependency and the algorithm must be optimized to run the dependent tasks in serial as necessary and in parallel as much as possible.
Below is a typical example of a data structure such as a Graph, which can be used to represent scheduling constraints. A graph is an extremely powerful data structure in computer science that gives rise to very powerful algorithms.
A graph data structure consists of two basic elements:
Vertex – A single node in the graph, often encapsulates some sort of information.
Edge – Connects one or two vertices. Can contain a value.

A graph is collection of vertices connected by edges.
The implication of a directed graph leads to an expressive programming model. By using directed graph it is easy to enforce the one-way restriction. The definition says that a directed graph is a set of vertices and a collection of directed edges. Each directed edge connects an ordered pair of vertices. Here each task is represented as a Node in a graph, and the dependency between two nodes is represented by a direct edge.
dag

In this representation of a Directed Graph, Node 1 has dependencies on Node 4 and 5, Node 2 depends on Node 5, Node 3 has dependencies on Node 5 and 6 and so on.

See the code below for a simple implementation of a Directed Graph. The implementation is not the most elegant. It follows the imperative paradigm with mutable variable, but for demo purpose you get the idea of implementation.

type DirectGraph(value:int) =
let mutable e = 0

let vertices = Array.init value (fun _ -> List())

member this.Vertex = value
member this.Edge = e

member this.getVertex(v:int) = vertices.[v]

member this.AddEdge(v:int, w:int) =
vertices.[v].Add(w)
e

This code is a good starting point, but there are some problems.

How can we ensure that all the edges required have been registered? Consider if Node 2 with dependencies to Node 7 and 8 is registered, but maybe Node 8 isn’t. Moreover, it could happen that some edges depend on each other, which would lead to a Directed Cycle. In the case of a Directed Cycle, it is critical to run some tasks in parallel; otherwise certain tasks could wait on another forever in a deadlock.

Another problem is registering a set of computations that have an order and precedence constraint. This means that some tasks must complete before some other task is begun. How can the system enforce and verify that all the tasks are completed while still respecting the ordered constraint?
The solution is called Topological Sort, which means that I can order all the vertices of the graph in such a way that all its directed edges target from a vertex earlier in the order to a vertex later in order. For example, if a Task A must be completed before Task B, and Task B must be compete before Task C which must complete before Task A; then there is a cycle reference and the system will notify of the mistake by throwing an exception. If a precedence constraint has a direct cycle, then there is not a solution. This kind of checking is called Directed cycle detection.
If a Directed Graph has satisfied these rules, it is considered a Directed Acyclic Graph (DAG), which is primed to run several tasks, which have dependencies in parallel.
The link here is a great article providing additional information about DAGs Paralleling operation with dependencies

Back to the figure above, Task 7 and 8 run in parallel. As soon as Task 8 complete the Task 5 starts and Task 6 will run after Task 7 and 8 are both complete, and so on.
Let’s implement the DAG solution applying the strategy we have learn here to run in tasks in parallel while respecting the order of the dependencies for increasing the performance.

Now, let’s define the data type representing the Task

Type TaskInfo =
{ Context : System.Threading.ExecutionContext
Edges : int array
Id : int
Task : unit -> unit
NumRemainingEdges : int option
Start : DateTimeOffset option
End : DateTimeOffset option }

The Type TaskInfo contains and keeps track of the details of the registered task, the id, function operation and dependency edges. The execution context is captured to be able to access information during the delayed execution such as the current user, any state associated with the logical thread of execution, code-access security information, and so forth. The start and end for the execution time will be published when the event fires.

member this.AddTask(id, task, [<ParamArrayAttribute>] edges : int array) =
let data =
{ Context = ExecutionContext.Capture()
  Edges = edges
  Id = id
  Task = task
  NumRemainingEdges = None
  Start = None
  End = None }

dependencyManager.Post(AddTask(id, data))

The purpose of the function AddTask is to register a task including arbitrary dependency edges. This function accepts a unique id, a function task that has to be executed and a set of edges which are representing the ids of other registered tasks which all must all be completed before the current task can executed. If the array is empty, it means there are no dependencies.

[<CLIEventAttribute>]
member this.OnTaskCompleted = onTaskCompleted.Publish

The event OnTaskCompleted triggered each time a task is completed providing details such as execution time.

member this.ExecuteTasks() = dagAgent.Post ExecuteTasks

The function ExecuteTasks starts the process executing the tasks.

The core of the solution is implemented using a MailboxProcessor (aka Agent) which provides several benefits. Because the natural thread-safety of this is primitive, I can use .NET mutable collection to simplify the implementation of DAG. Immutability is an important component for writing correct and lock-free concurrent applications. Another important component to reach a thread safe result is isolation. The MailboxProcessor provides both concepts out of the box. In this case, I am taking advantage of isolation.

Overall is about finding the right tool for the job and being pragmatic in your approach,  in this case the .NET generic mutable collections work.

The MailboxProcessor named dagAgent is keeping the registered tasks in a current state “tasks” which is a map (tasks : Dictionary<int, TaskInfo>) between the id of each task and its details. Moreover, the Agent also keeps the state of the edge dependencies for each task id (edges : Dictionary<int, int list>). When the Agent receives the notification to start the execution, part of the process involves verifying that all the edge dependencies are registered and that there are no cycles within the graph.

let verifyThatAllOperationsHaveBeenRegistered (tasks:Dictionary<int, TaskInfo>) =
            let tasksNotRegistered =           
                tasks.Values                 
                |> (Seq.collect (fun f -> f.Edges) >> set)
                |> Seq.filter(tasks.ContainsKey >> not)
            if tasksNotRegistered |> Seq.length > 0 then
                let edgesMissing = tasksNotRegistered |> Seq.map (string) |> Seq.toArray 
                raise (InvalidOperationException
                     (sprintf "Missing operation: %s" (String.Join(", ", edgesMissing))))
let verifyTopologicalSort(tasks:Dictionary<int, TaskInfo>) =
    // Build up the dependencies graph
    let tasksToFrom = new Dictionary<int, MList>(tasks.Values.Count, HashIdentity.Structural)
    let tasksFromTo = new Dictionary<int, MList>(tasks.Values.Count, HashIdentity.Structural)

    for op in tasks.Values do
    // Note that op.Id depends on each of op.Edges
        tasksToFrom.Add(op.Id, new MList(op.Edges))
        // Note that each of op.Dependencies is relied on by op.Id
        for deptId in op.Edges do
        let success, _ = tasksFromTo.TryGetValue(deptId)
        if not <| success then tasksFromTo.Add(deptId, new MList())
        tasksFromTo.[deptId].Add(op.Id)

    // Create the sorted list
    let partialOrderingIds = new MList(tasksToFrom.Count)
    let iterationIds = new MList(tasksToFrom.Count)

     let rec buildOverallPartialOrderingIds() =  
           match tasksToFrom.Count with
           | 0 -> Some(partialOrderingIds)
           | _ ->  iterationIds.Clear()
                        for item in tasksToFrom do
                            if item.Value.Count = 0 then
                                iterationIds.Add(item.Key)
                                let success, depIds = tasksFromTo.TryGetValue(item.Key)
                                if success = true then
                                    // Remove all outbound edges
                                    for depId in depIds do                                  
                                        tasksToFrom.[depId].Remove(item.Key) |> ignore
                        // If nothing was found to remove, there's no valid sort.
                        if iterationIds.Count = 0 then None
                        else
                            // Remove the found items from the dictionary and 
                            // add them to the overall ordering
                            for id in iterationIds do
                                tasksToFrom.Remove(id) |> ignore
                            partialOrderingIds.AddRange(iterationIds)
         buildOverallPartialOrderingIds()   

If any of the validations are not satisfied, the process is interrupted and an error is thrown. For demo purposes only the message is printed in the console, a better solution should be to provide a public handler.

inbox.Error |> Observable.add(fun ex -> printfn "Error : %s" ex.Message )

If the validation passed successfully, the process starts the execution, checking each task for dependencies thus enforcing the order and prioritization of execution. In this last case the edge task is re-queued into the dagAgent using the “QueueTask” message. Upon completion of a task, we simply remove the task from the graph. This frees up all its dependencies to be executed.

Here below the full implementation of the dagAgent:

       
let dagAgent =
    let inbox = new MailboxProcessor(fun inbox ->
        let rec loop (tasks : Dictionary) 
                     (edges : Dictionary) = async {
                let! msg = inbox.Receive()
                match msg with
                | ExecuteTasks ->
                    // Verify that all operations are registered
                    verifyThatAllOperationsHaveBeenRegistered(tasks)
                    // Verify no cycles
                    verifyThereAreNoCycles(tasks)

                    let dependenciesFromTo = new Dictionary()
                    let operations' = new Dictionary()

                    // Fill dependency data structures
                    for KeyValue(key, value) in tasks do
                        let operation' =
                            { value with NumRemainingEdges = Some(value.Edges.Length) }
                        for from in operation'.Edges do
                            let exists, lstDependencies = dependenciesFromTo.TryGetValue(from)
                            if not <| exists then 
                                dependenciesFromTo.Add(from, [ operation'.Id ])
                            else
                                dependenciesFromTo.[from] <- (operation'.Id :: lstDependencies)
                        operations'.Add(key, operation')
                   
                    
                    operations' |> Seq.filter (fun kv ->
                                           match kv.Value.NumRemainingEdges with                                                 
                                           | Some(n) when n = 0 -> true
                                           | _ -> false)
                                |> Seq.iter (fun op -> inbox.Post(QueueTask(op.Value)))
                    return! loop operations' dependenciesFromTo
             
                | QueueTask(op) ->
                        Async.Start <| async { 
                            // Time and run the operation's delegate
                            let start' = DateTimeOffset.Now
                            match op.Context with
                            | null -> op.Task()
                            | ctx ->
                                ExecutionContext.Run(ctx.CreateCopy(),
                                                        (fun op -> let opCtx = (op :?> TaskInfo)
                                                                   (opCtx.Task())), op)
                            let end' = DateTimeOffset.Now
                            // Raise the operation completed event
                            onTaskCompleted.Trigger  { op with Start = Some(start')
                                                               End = Some(end') }
                            
                            // Queue all the operations that depend on the completation 
                            // of this one, and potentially launch newly available
                            let exists, lstDependencies = edges.TryGetValue(op.Id)
                            if exists && lstDependencies.Length > 0 then
                                let dependentOperation' = getDependentOperation lstDependencies tasks []
                                edges.Remove(op.Id) |> ignore
                                dependentOperation'
                                    |> Seq.iter (fun nestedOp -> inbox.Post(QueueTask(nestedOp))) }
                        return! loop tasks edges
              
                | AddTask(id, op) -> tasks.Add(id, op)
                                     return! loop tasks edges
            }
        loop (new Dictionary(HashIdentity.Structural)) (new Dictionary(HashIdentity.Structural)))
    inbox.Error |> Observable.add(fun ex -> printfn "Error : %s" ex.Message )
    inbox.Start()
    inbox

You can find the complete code implementation here .

To run an example we can replicate the edge dependencies in the figure above.

let dagAsync = Async.DAG.ParallelTasksDAG()
dagAsync.OnTaskCompleted |> Observable.add(fun op -> System.Console.ForegroundColor printfn "Completed %d" op.Id)

dagAsync.AddTask(1, acc1, 4,5)
dagAsync.AddTask(2, acc2, 5)
dagAsync.AddTask(3, acc3, 6, 5)
dagAsync.AddTask(4, acc4, 6)
dagAsync.AddTask(5, acc5, 7, 8)
dagAsync.AddTask(6, acc6, 7)
dagAsync.AddTask(7, acc7)
dagAsync.AddTask(8, acc8)
dagAsync.ExecuteTasks()

The ouput should be

ouput

I hope you find this to be a useful example of how you can leverage parallelism to optimize your applications.